Finally found time to share my hybrid build. It's almost finished, but I don't see many people using the 94-98 KXs, so I wanted to show how I went about it..
First, acquire derelict chassis - $60

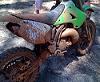
Next, strip super nice KDX (acquired from my friend in 2012, who was the OO since 2002)
From this:

To this:

Next, sell bottom end? (Still available in the Parts & Bikes forum!!)
https://scontent-a.xx.fbcdn.net/hphotos ... 8110_n.jpg
Mocked up frame and rear end.

I decided to use the entire KDX rear suspension- rocker, dogbones, shock, swingarm, everything.
First, drilling out a case is really freaking hard without good drill bits, which are expensive.
Second, should I ever want to sell the KDX engine, it will technically be unmolested. Although, I really am itching to send it off to RB to get the full monty!
Now the slightly unfortunate- while paint stripping and breaking down the KX, I noticed a sheared engine cradle tube. It was still barely attached, but I wanted to cut out the cancer and fix it for good measure:


Being a suspension engineer by day, I wanted to at least make sure the ratios in the rear were going to be *close*. Maybe not perfect, but for peace of mind, I mocked up the rear suspension of each bike in Creo, and made manipulable suspension models with sketches and proper constraints.
Here's the graphed result of the progressiveness of each setup.

Alright, so now I know I'm going to use the KDX rear. Next step was to fab some bushings to downsize the 17mm KX swingarm pivot holes to 14mm. Word of warning, making a sturdy bushing of wall thickness (17-14)/2 = 1.5mm, or ~.060in is REALLY hard. I have years of machining experience, and it was damn-near impossible on the equipment I had (backwoods engine lathe, nichts on the accuracy...)
I patiently dremelled and sanded out the holes to about 18mm. Believe it or not, the extra .020 of wall thickness this gave me was a savior. I'm sure with a good lathe, you could make a 17mm bushing w/ a 14mm hole, but it wasn't an option for me. So here's the finished product. It's very very close to round, despite the perspective of the pic (maybe 1-2 thou out.)


With the swingarm and engine ready to bolt on, I mocked up the engine position, basically bringing it low enough for the bottom of the engine to be about parallel with the lower cradle tubes. Here are the resulting mounts:

And just like that, it's ready for powdercoat!


And for the past few days I've been reassembling. I was annoyed with 12 years of dirt stains on the engine, so I read up and used Eagle One Mag Wheel Cleaner- used for rough aluminum castings. It worked like a charm...
Before:

and After:

Engine in, swingarm in, front forks rebuilt and assembled:

Just received a new OEM Acerbis plastics kit today, assembly to continue this week!


