Page 3 of 9
Posted: 06:53 pm Mar 11 2010
by Slick_Nick
I should add, thoughts OTHER than "do a KX fork swap..."
Posted: 08:33 pm Mar 11 2010
by Green Hornet
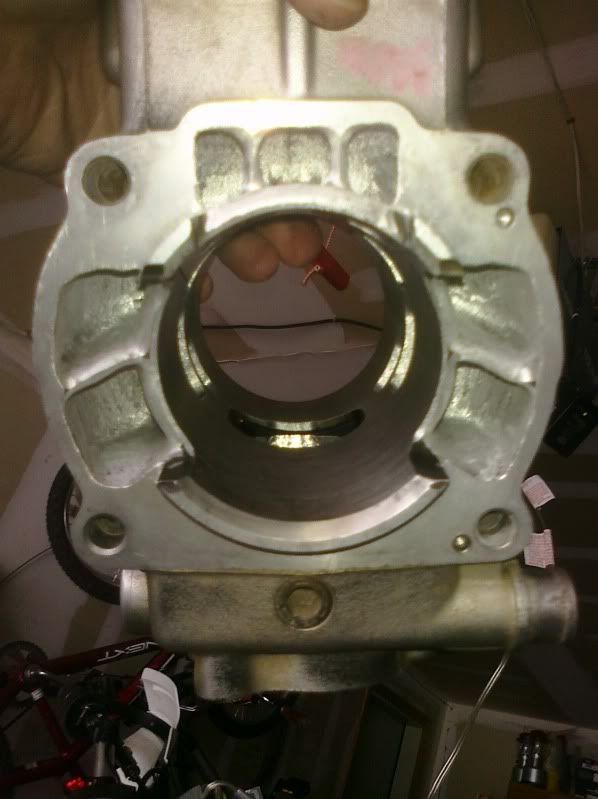
Also regarding your "PORTING" It appears Fredette did that Port Job...
Posted: 11:31 pm Mar 11 2010
by Slick_Nick
Sweet. How can you tell?
Posted: 06:13 pm Mar 12 2010
by Green Hornet


Slick_Nick wrote:Sweet. How can you tell?
Looks like mine.....And I now have OVER REV
Posted: 10:23 pm Mar 12 2010
by Slick_Nick
Sweet, good stuff. Should work well with my RB mods then. Mine revs out pretty nicely, i guess I'd have to compare back to back to see the difference.
Posted: 10:43 pm Mar 12 2010
by scheckaet
I don't think anyone successfully mated RB mod and porting from FRP. You might wanna do a search and mention it to Ron...
Posted: 09:56 am Mar 13 2010
by Green Hornet
Canadian Dave did the RB & FRP Porting years ago & worked for him. My bike seems to run fine. Definately more UMPF. Also mine looks NOTHING LIKE CARVERS PORT JOB. The porting on mine was slight, not a BIG GAPPING GAP like Carvers.
Posted: 08:58 pm Mar 13 2010
by Slick_Nick
Busy last few days. Managed to find a COMPLETE set of KDX forks on ebay for $35, so I bought them and the guy is going to gut them for me and ship the base valves. Whew!
The PO had the bike jetted really rich, so I decided to repack the silencer. Glad I did as you can see it was gummed up. I decided while I was in there to completely disassemble it and clean the spark arrestor too.
Gross SA:

Soaked packing:

The "TurbineCore":
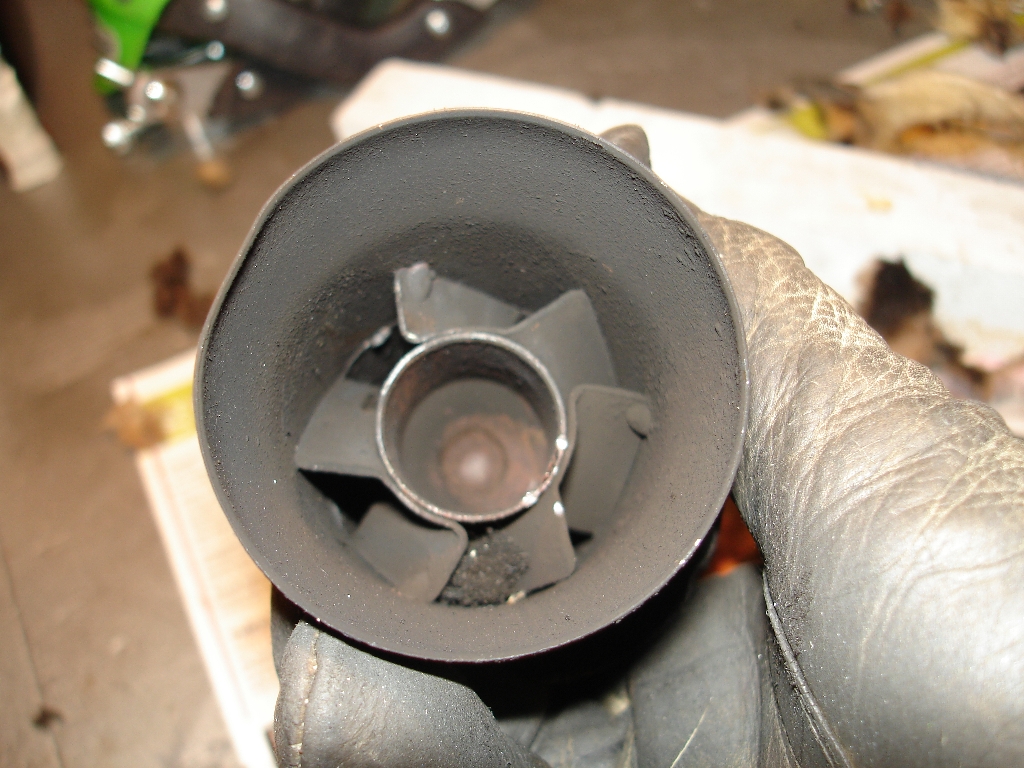
Cleaning it up:

Much better! Ready for repack:

Don't forget the silicone to seal it all up! Around the rivets and bolts too!

When I was done, I noticed the casing was a little worse for wear, so I decided to polish it back up. Before:

After:


Next up was the expansion chamber. I wanted to get all the carbon and shiz out of that thing, so rather than use the "cable brush" technique, I threw some coarse media into the sandblaster, and went to town on the inside at 150psi for about 15 minutes. There's no WAY there's any carbon left in there!
Big end:

Stinger:

Polished the expansion chamber up too while I had the buffer out. Not as good as the silencer, but MUCH better than it was! Before:


After:


Next up, got my linkage seal this morning, so I put the shock in (it's recharged and ready to go) and torqued all the shock and linkage bolts to spec. Swingarm bolt will wait until the engine is in.


Tightened the front wheel spokes, and cleaned and regreased wheel bearings. (Rear wheel was done previously.) Rebuilt and repacked odo housing as well.


Finally, got into the clutch and measured everything up. Plates, friction plates, and springs are all NFG.

Filed the clutch basket, made the filing smooth, and drilled holes to assist with lubrication. Some people go biggerthan that, I didn't want to risk weakening the basket too much.


That's all for today, keep checking back!
Posted: 10:51 pm Mar 13 2010
by ihatefalling
I just now saw this thread. MAN...you are giving that bike a workover. Can't wait to see her all back together

Posted: 10:57 pm Mar 13 2010
by Julien D
Looking really good man. You're kinda freaking me out by doing all that work and re-using all those old rusty crusty bearings though. Seems if you're going to put all that time and effort in you'd want to be avoiding having to tear it down again in a few months because of failing steering/linkage/wheel bearings. Bearings are cheap!
Ah well....
Posted: 02:00 am Mar 14 2010
by scheckaet
depending on how much he rides, they might give him a full season of ridin...wouldn't put that much effort into old bearing but when you're on a budget you're on a budget

Posted: 07:33 am Mar 14 2010
by Julien D
Yeah but I can think of better ways to save money. Like forgo new graphics in favor of replacing the bearings. Function over form, and all that....
either way the bike is looking great so far!
Posted: 09:59 am Mar 14 2010
by Slick_Nick
The bearings are fine guys, just because they're dirty to start does NOT mean they're junk. I give all the bearings a once-over after they've been cleaned. They all move smoothly, without binding, and none of the surfaces are worn. The only reason they didn't move freely before is that they were jammed up with crud. Clean all that outta there, shoot some fresh grease in and they're like new. The graphics came with the bike, I didn't purchase them.
Posted: 10:08 am Mar 14 2010
by jswag
Can i send you my bike when your done!

Posted: 11:24 am Mar 14 2010
by barryadam
scheckaet wrote:... but when you're on a budget you're on a budget
Yeah, but at least he bucked up for a camera that takes decent pics.
(prolly sold that Subaru wheel do get the $. Seriously, man. Get that wheel fixed, will ya. How long's it been on jacks?)

Posted: 11:56 am Mar 14 2010
by Slick_Nick
barryadam wrote:scheckaet wrote:... but when you're on a budget you're on a budget
Yeah, but at least he bucked up for a camera that takes decent pics.
(prolly sold that Subaru wheel do get the $. Seriously, man. Get that wheel fixed, will ya. How long's it been on jacks?)
For the last time it's not a Subaru, it's a Mazda...
Its not on jacks for lack of a wheel, it's without engine and trans at the moment. Been an ongoing build for awhile. It's been on jacks since Sept. '08.
The camera is just a sony point and shoot...
Posted: 09:08 pm Mar 14 2010
by ihatefalling
Posted: 09:26 pm Mar 14 2010
by Slick_Nick
Thanks guys!
Has anyone else modded their stock basket like I did? Did you notice any difference in feel?
Posted: 07:54 pm Mar 16 2010
by Slick_Nick
Got a BIG package from RMATV today! :D
-PD Front Sprocket
-PD Rear Sproket
-PD O ring chain
-Tusk fork poppers
-Tusk brake pads (F+R)
-Tusk Case splitter
-Tusk flywheel puller
-Tusk crank installer
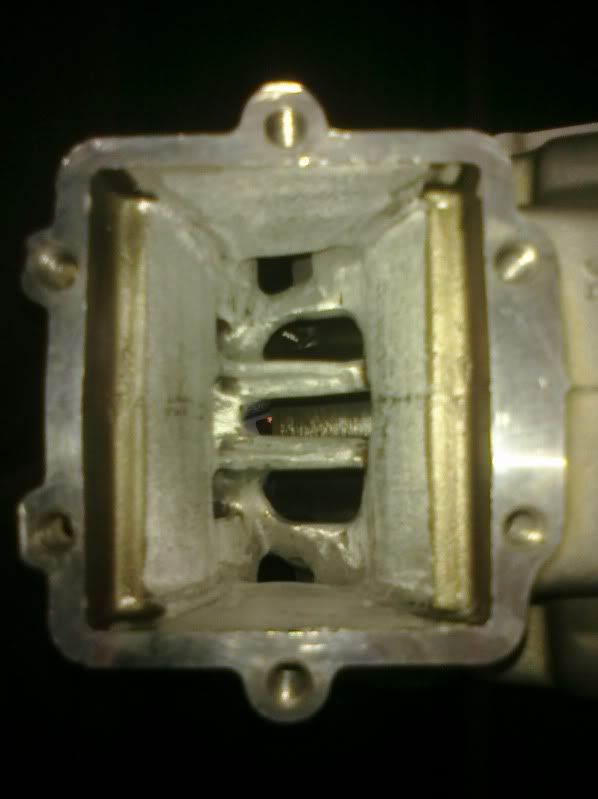
-V-Force 3i Reed valve

FINALLY got the flywheel off, with a BFH and a blowtorch!


The new toy all set up:

The reason why we're here. A leaking main seal:

Left side off. Damn bearings always stick to the crank.

Pushing the crank out of the right side case:

Noticed a broken wire on the lighting coil, time for a rewind!

After that, I spent alot of time removing gasket material from the case halves, etc. I'm on my way into the work shop right now to press those bearings off the crank and throw everything into the parts washer and get it all cleaned up.
Observations: After seeing my gearsets, clutch, etc. I can say, without a doubt, that
ATF type F is a perfect choice for dirt bike transmissions. Everything was nice and clean, and other than the clutch nothing was worn at all. That's all for today, check back again tomorrow!
Posted: 11:26 pm Mar 16 2010
by barryadam
Slick_Nick wrote:Got a BIG package from RMATV today!
Merry Christmas, Nick !!
Have you given any thought to reassembling that flywheel that you are saluting in pic #3? Can you see any reason why it was so difficult? Corrosion? Pressed on too hard? Galled surface? Just didn't like you?
On bigger bikes, it's best practice to use a new key every time and to lap the tapers together (flywheel to crankshaft). Inspect the crank thread, washer, lock washer, and nut carefully (use new, if in doubt), use anti-sieze on everything,and torque properly. Never had a problem after that with removal, either planned or unplanned.
Looking good, btw.
P.S. You're gonna love them VF3's