Page 2 of 9

Posted: 10:21 pm Feb 22 2010
by Indawoods
You seriously used those bearings?

Posted: 10:33 pm Feb 22 2010
by Slick_Nick
Yup. Once all the gunk and rust was outta there and I put some elbow grease into them, they came out great! :cool:

Posted: 10:42 pm Feb 22 2010
by Indawoods
I will say you are unconventional and go against everything I know...

Carry on.... :mrgreen:

Posted: 10:54 pm Feb 22 2010
by Slick_Nick
I figured that an $8 can of brake cleaner was worth trying if it meant saving me from $80 bearings. So, I cleaned, packed, cleaned, repacked, cleaned, repacked again, etc... After an hour all bearings were rolling smooth with no play. They didnt look very nice when I started, but rest assured. I'm an anal prick, I would never use parts that are completely shot. But I'm also a jew, and save my pennies! :mrgreen:

Posted: 11:01 pm Feb 22 2010
by Indawoods
:lol: Let us know how long they last ya....

Posted: 01:43 am Feb 23 2010
by barryadam
>|<>QBB<
Slick_Nick wrote:"...an anal prick..."
Why would you use those words together in a sentence? :?

Posted: 09:43 pm Feb 23 2010
by Slick_Nick
Didnt get a whole lot done today either. Finished up the sinwgarm by installing the kickstand and chain guide, all bolts were locktited and torqued down. Swingarm is completely done now minus decals. Speaking of which, I'm choked. The '98 swingarm decals I was going after have been discontinued by Kawasaki. Anyone know where I can get some?

Image

Went ahead and removed the stock graphics, and installed my new Factory Effex ones after I cleaned and shined the plastics.

Image

Image

Image

Last up, I began the rebuild of the rear shock. I ran out of time, I had to pick up the girlfriend from work. Just got it apart today. Tomorrow I'm going to clean it all up, grease the bearings, fill it with oil, and take it to Costco to have them charge it with nitrogen. The oil that came out was black and milky, I'm glad I'm changing it. I'm going to use some fresh Motorex 5W.

Image

Have a good night!

Posted: 09:17 pm Feb 24 2010
by Slick_Nick
Today, did lots of the "little things" that take forever, but dont show much forward progress. I decided to try a new media for the sandblaster today. Went with crushed walnut hulls. It's great for aluminum, but not steel. It's very soft so anything aluminum you have won't be damaged, but will coem out looking like new. I did almost all the external parts of the rear shock. The housing came out great, as you can see, it looks like new, compared to old and shitty above.

Here you can see the entire rear shock apart, cleaned and ready to go back together.

Image

Got it setup in the vice for re-assembly:

Image

Image

Added the oil as per the shop manual. Using Motorex 5W.

Image

Reinstalled the bladder:

Image

Installed the spring, torqued everything down, bled the air, and it's all done. Just need to get the nitrogen charged tomorrow.

Image

The rads were looking a little worse for wear, so I blasted them, and cleaned all the hardware. Before:

Image

After:

Image

Image

Next up was the linkage. Just rebuilt this a few months ago, it was still pretty clean. Cleaned, repacked, and re-assembled.

Image

Image

Image

Image

Also, walnut blasted the head. Doesnt look as bad as I once thought. I might send it to RB designs anyway, see if he can do his best. There's only 1 area where you can catch your nail on, as long as he can get it better than it was.

Image

That's all for now!

Posted: 09:59 pm Feb 24 2010
by scheckaet
what type of blaster do you have? I assume you had to protect the fines when you did the radiator? Do you have to use the same type of protective equipment than with sand/silica blasting? (I know nothing about blasting obviously) Came out nice and beats the hell out of elbow grease!
Sorry to highjack your post.

Posted: 10:16 pm Feb 24 2010
by Slick_Nick
I just have a cheap siphon blaster that I got from Princess Auto. (Similar to Harbor Frieght in the USA) I didn't mask off the fins, the blaster worked well to remove the years of dead bug guts! :wink:

For protective equipment, I just wear some coveralls and I bought a $9 sandblasting hood. Dont forget good gloves too. Then I just do it out in the yard.

Posted: 08:10 pm Mar 08 2010
by Slick_Nick
Ok guys, sorry there has been NO updates, but that is gonna change tomorrow! I finally finished up my move, so now it's back full bore on the bike. I want to have it done for March 20th, that includes having all my stuff sent out to RB and back. He's only in Portland, not too far so shipping shouldnt take long.

Got a few new parts:

Renthal CR High Bends
Renthal Dual Layer Grips
Wiseco Con Rod
Wiseco Piston
Wiseco Main Bearings
ProSeal air filter gasket
Misc. Kawi parts
Moose Racing complete gasket and seal kit

I'm stoked, I FINALLY found an Acerbis DHH in GREEN!!! They've been discontinued, and eveywhere I look online doesnt have them in stock, and can't get any. So I go down to this one shop in my city that sells Kawi, and they had TWO hanging on the wall. Gonna pick one up this week.

Got a harmonic balancer puller for $24, I think it will work as a case splitter / flywheel puller (you'll see what I mean.) If it works out well, that will save me close to $100 USD on tools alone.

Tomorrow, plan is to get the cases split, and really give that crank the once over. I think I'm going to reuse it, depending on what I find. I'm going to have it spun up on a balancer at my machine shop, and make sure it still balances out. If so, It's getting rebuilt with the new Wiseco rod, and that's that, despite how it looks.

After splittign the cases and having a look inside (hope I find no surprises) I'm going to do an oil change and shim stack modification on the front forks, grease up the steering head bearings, and install the new bars and grips. I don't know how far I'll get, the engine might take me awhile, and forks are a priority. The grips will be painted (I find it works better than the glue??) as well as safety wired. Of course I'll lube up all the cables n stuff while I'm in there.

These 220R decals are REALLY pissing me off. They're discon. from Kawi, and the '00 ones from my model year are special order, and $24 PER SIDE! I REALLY like the "220R" style, so either I have some made custom, or just get some generic "Kawasaki" swingarm decals. What do you guys think? Please let me know!

Posted: 01:04 am Mar 09 2010
by scheckaet
why don't you paint on your swing arm instead of using decals? Seems you already have all the tools for that...

Posted: 10:24 pm Mar 10 2010
by Slick_Nick
Got the front end work underway today. Had a few setbacks, like snapping the fork base valve when removing the shim stack nut! Now I need a whole new valve off ebay. Started by removing the old bars, bark busters, controls, etc. Pulled the fork legs and set them aside:

Image

Then got into the triple clamps. I dont think they had EVER been cleaned since the bike was new, 10 years ago. Looks nice huh?

Image

After 20 mins of cleaning:

Image

Image

And after 30:

Image

Image

Repacked, and they are moving great. No binding, good as new! Removed and inspected the bar cones, they're fine, so I walnut blasted the triple clamps while they were off.

Image

Reinstalled the triple clamps:

Image

Image

Image

Next up, I took apart the airbox, and installed my ProSeal air filter gasket. Also, the KDX's are problematic for dirt getting in between the air boot and the filter housing, so I added some RTV to seal it up while it was apart:

Image

Image

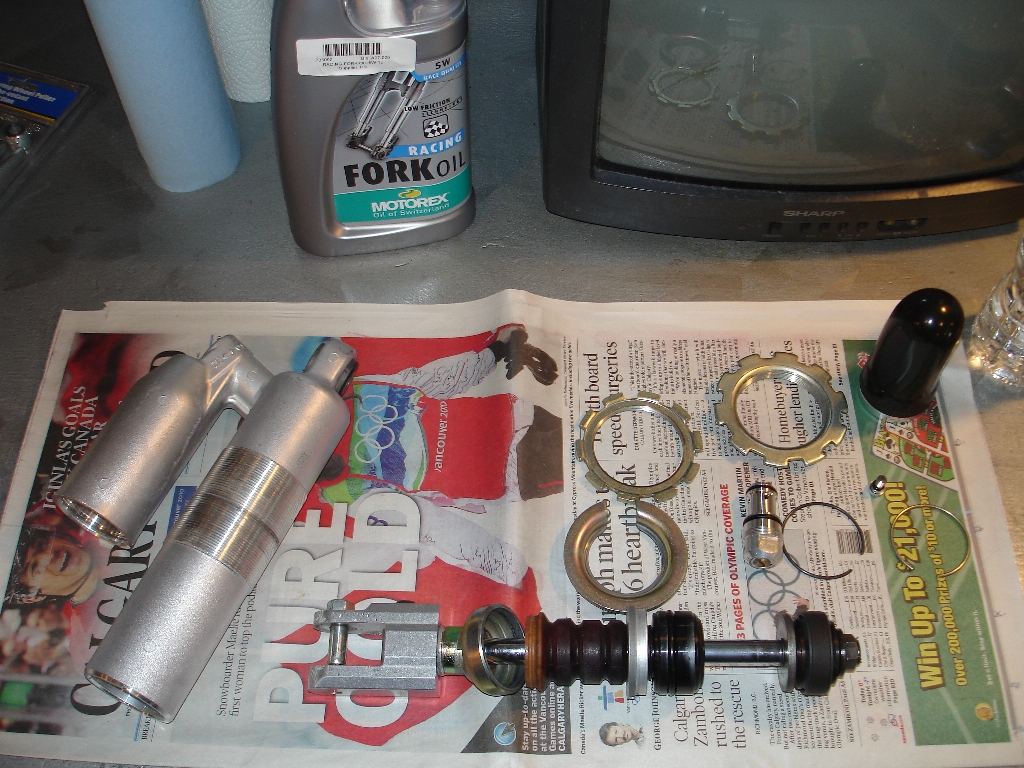
Next up, the forks were taken apart, cleaned, inspected, and the oil changed. The oil I dumped out looked like swamp water... Hopefully now I get better performance from my forks. The springs are already upgraded, I might modify the preload spacer later on, I'll see how this works.

Image

Went ahead with the base valve shim stack mod, here is the first valve all laid out, the shims at the bottom.

Image

There were 10 big shims, I removed 4, leaving 6 in there. The completed valve:

Image

Onto valve #2, I bended the locking tabs back in, and as I was loosening the top nut, SNAP! Now I need a new base valve assembly...

Image

Removed the inner clutch cover, got all the "stuff" out of the way to split the cases. Found an interesting set of holes. One had a tiny piece of aluminum come from it, I'm guessing these arent supposed to be there... I'll see what's on the other side when I split the cases, but this isn't good news.

Image

Image

Got the case laid out, got the flywheel nut off, and went to remove the flywheel:

Image

Image

FOUR hours, THREE different pullers, liquid wrench, a torch, a hammer, and NOTHING could get this effing flywheel off. I know, I know, use the "proper" tool, but I tried 3 different pullers, and this thing would not budge. I ordered a flywheel puller anyway, but ive heard stories of them stripping out the flywheel if it's really stuck like this. I even tried getting to the woodruff key and banging it in more to see if that helped, nothing.

Anyway, that's all for today. I'm debating on modifying the preload spacers in the forks, will do some more research. Other than that, waiting on parts to split the cases, and now a base valve before I can put the forks back in. I'll probably sandblast and spray the bottom of the legs like I did the swingarm though anyway.

Posted: 10:41 pm Mar 10 2010
by scheckaet
"Also, the KDX's are problematic for dirt getting in between the air boot and the filter housing, so I added some RTV to seal it up while it was apart: "

Never heard of this issue, are you sure your boot was set properly? Are you using any grease on the base of the filter? never had this issue on mine.
Also, I was told using rtv on the air filter was not a good idea, if some breaks up might get in the carb and in the engine...

As for the hole on the clutch cover, I think it's normal, somebody will probably chime in to confirm.
Just my .o2

BTW, good FOCUSED pics, glad to see some can take pics, youprobably ride a 200 and not a 220 to take pics of such a good quality :busted:

EDIT: just saw you're ridin a 220, must be the exception that confirms the rules :lol:

Posted: 11:10 pm Mar 10 2010
by Slick_Nick
My airbox was ok i just put the RTV to be safe. Alot of them do lean bewtwwn the plastic filter holder and the rubber boot. I dont use grease on the base of the filter, I have the pro seal gasket.

Posted: 11:21 pm Mar 10 2010
by Indawoods
I love my Pro Seal.... best thing since sliced bread!

Posted: 07:25 am Mar 11 2010
by KarlP
Tell us again why you are splitting the cases?
The KDX bottom end is pretty durable, I wasn't aware that yours had a problem.

Posted: 09:06 am Mar 11 2010
by scheckaet
I dunno if you'll be able to get JUST the base valve off ebay, you might give fredette a call and see if he can hook you up.
If it was me, I'd hunt for a set of KX forks/wheel, will cost you a little more but not that much if you're patient.
Actually someone here is selling a kx 500 fork in the for sale section...

Posted: 12:22 pm Mar 11 2010
by Slick_Nick
>|<>QBB<
KarlP wrote:Tell us again why you are splitting the cases?
The KDX bottom end is pretty durable, I wasn't aware that yours had a problem.
See page 1 please...

Posted: 06:53 pm Mar 11 2010
by Slick_Nick
Finding JUST the shock valve is proving difficult. Dealer wants $170 new (OUCH!) I found these guys, would give me adjustable rebound:

http://www.racingsuspensionproducts.com ... vekit.html

Thoughts?