2004 KDX 200 Rebuild
-
KDXGarage

- KDXRider.net

- Posts: 14060
- Joined: 06:45 am Nov 01 2004
- Country: United States of America
- Location: AL, USA
- Contact:
Re: 2004 KDX 200 Rebuild
On another forum, people were oohing and ahhing about some frames a guy had had done. I asked for an after riding for a while picture. It looked bad to me. It is my personal preference only. They look awesome in all the "has not been on the track / trail yet" pictures, though.
Thank you for participating on kdxrider.net. 
To post pictures from a device: viewtopic.php?f=88&t=24128
To post pictures from a device: viewtopic.php?f=88&t=24128
-
Vossman
- Supporting Member II

- Posts: 262
- Joined: 06:23 pm Jul 24 2017
- Country: USA
Re: 2004 KDX 200 Rebuild
I don’t think it needs much.
-
KDXGarage
- KDXRider.net
- Posts: 14060
- Joined: 06:45 am Nov 01 2004
- Country: United States of America
- Location: AL, USA
- Contact:
Re: 2004 KDX 200 Rebuild
can of each, back to new
Get some clear number plate background material to cover up the boot rub area afterwards. Looks great now!
Get some clear number plate background material to cover up the boot rub area afterwards. Looks great now!
Thank you for participating on kdxrider.net.
To post pictures from a device: viewtopic.php?f=88&t=24128
To post pictures from a device: viewtopic.php?f=88&t=24128
-
Vossman
- Supporting Member II
- Posts: 262
- Joined: 06:23 pm Jul 24 2017
- Country: USA
Re: 2004 KDX 200 Rebuild
Even prep time wouldn’t be long. I can just sand the outer areas off, wipe off, tape it and go.
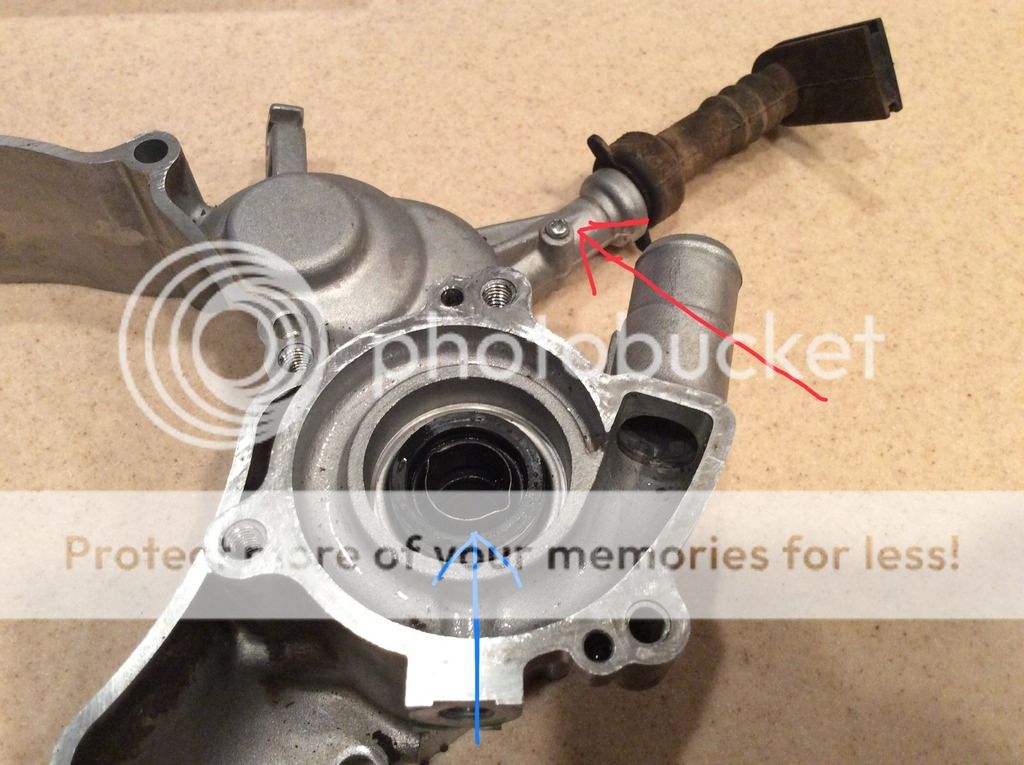
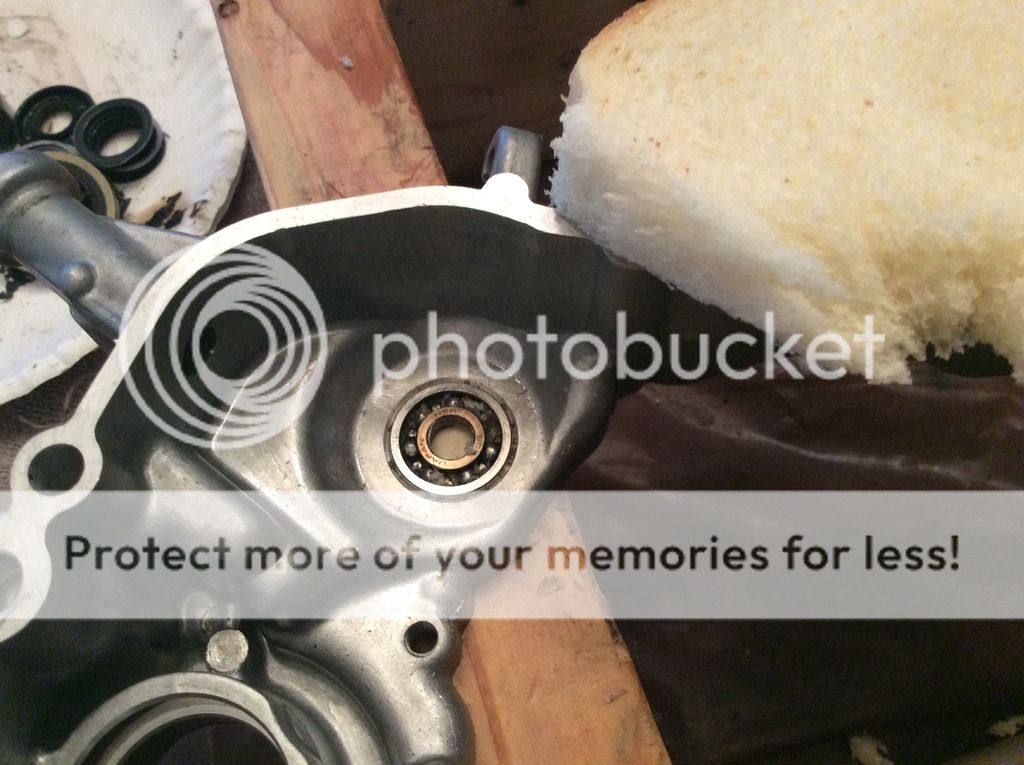
What is the purpose of the little screw (red arrow)? I’m gonna have to drill it out now cause I stripped it. It stripped really easy. JIS hardened Phillips Head bits have been ordered.
Next question, is the water pump seal a once piece unit? Looks like it has to come out of the bearing side after the bearing comes out.
What is the purpose of the little screw (red arrow)? I’m gonna have to drill it out now cause I stripped it. It stripped really easy.
Next question, is the water pump seal a once piece unit? Looks like it has to come out of the bearing side after the bearing comes out.
Last edited by Vossman on 08:06 pm Jan 31 2019, edited 1 time in total.
-
KDXGarage
- KDXRider.net
- Posts: 14060
- Joined: 06:45 am Nov 01 2004
- Country: United States of America
- Location: AL, USA
- Contact:
Re: 2004 KDX 200 Rebuild
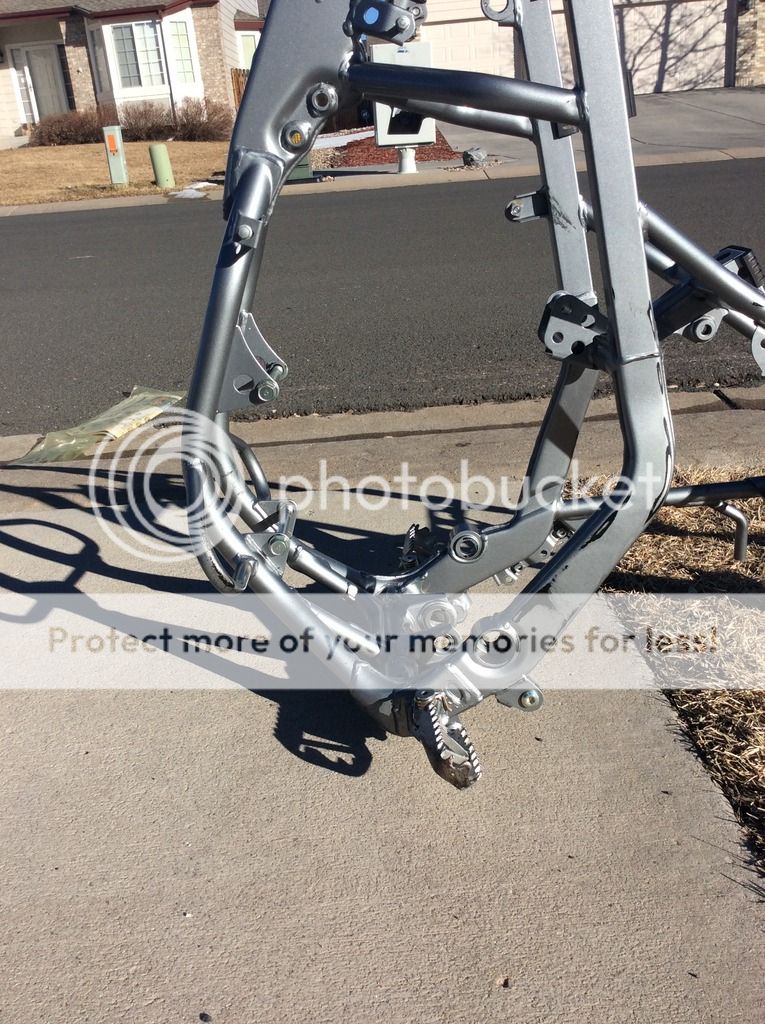
Here's a tip. When you paint the "boot rub" areas of the frame, consider painting on up the frame for a good way. Look at the side of your bike (in the picture from the first page). There is a "viewable" area from the footpeg up until the frame goes behind the radiator shroud. It is going to look a little odd if you only paint the bottom half just where the boots rub instead of blending off back behind the shroud. If the part above the shroud and the part below the shroud are a touch off, it will be hard to spot with the shroud breaking up the two areas.
Thank you for participating on kdxrider.net.
To post pictures from a device: viewtopic.php?f=88&t=24128
To post pictures from a device: viewtopic.php?f=88&t=24128
-
Vossman
- Supporting Member II
- Posts: 262
- Joined: 06:23 pm Jul 24 2017
- Country: USA
Re: 2004 KDX 200 Rebuild
Good point and the transition can be ugly as sin if it’s covered by plastic.
-
KDXGarage
- KDXRider.net
- Posts: 14060
- Joined: 06:45 am Nov 01 2004
- Country: United States of America
- Location: AL, USA
- Contact:
Re: 2004 KDX 200 Rebuild
I assume the red is to keep that shaft from coming out. I am not sure on the blue. I have never fooled with one.
Thank you for participating on kdxrider.net.
To post pictures from a device: viewtopic.php?f=88&t=24128
To post pictures from a device: viewtopic.php?f=88&t=24128
-
6 Riders

- Gold Member

- Posts: 2124
- Joined: 12:58 pm May 01 2013
- Country: USA
- Location: Washington
- Contact:
Re: 2004 KDX 200 Rebuild
Yes, it's a one piece seal, that is more than one piece. Find the "water pump" thread, there is a good explanation of how that assembly is put together. Make sure you change all that while you have it apart.
newbbewb wrote:^what he said.
*side note...I'm drunk, so try to read what I'm trying to say, instead of what I actually typemasterblaster wrote:Man 6 riders you rock.
-
ericr

- Gold Member
- Posts: 246
- Joined: 06:57 pm Nov 06 2017
- Country: USA
- Location: Gig Harbor, WA
Re: 2004 KDX 200 Rebuild
The screw is a retainer for the KIPS actuator shaft. Just heat it up and grab it with some channel locks - you probably don't need to drill it. Don't lose the pin that comes out from under the screw as I almost did.
When replacing the pump seal, be careful not to damage the carbon face. You can use a PVC pipe coupler to drive against the flange rather than the face. A water pump rebuild kit will have all the parts you will need.
When replacing the pump seal, be careful not to damage the carbon face. You can use a PVC pipe coupler to drive against the flange rather than the face. A water pump rebuild kit will have all the parts you will need.
'02 KDX 200, '02 KDX 220 - My restoration thread
-
ericr
- Gold Member
- Posts: 246
- Joined: 06:57 pm Nov 06 2017
- Country: USA
- Location: Gig Harbor, WA
Re: 2004 KDX 200 Rebuild
Good point on the JIS screws. They look like Phillips, but they are not. Phillips drivers are tapered and torque limiting. They can lift and strip out. Japanese machinery is build with JIS fasteners.
Here's the driver set I used on my KDX's. It includes JIS 1,2,3 and PoziDrive 2,3 (I think the tank strap screw is PoziDrive)
https://tinyurl.com/y8gq9w7v
Here's the driver set I used on my KDX's. It includes JIS 1,2,3 and PoziDrive 2,3 (I think the tank strap screw is PoziDrive)
https://tinyurl.com/y8gq9w7v
'02 KDX 200, '02 KDX 220 - My restoration thread
-
John_S
- Gold Member
- Posts: 877
- Joined: 06:59 am Jan 27 2017
- Country: US
- Location: Florida
-
Vossman
- Supporting Member II
- Posts: 262
- Joined: 06:23 pm Jul 24 2017
- Country: USA
Re: 2004 KDX 200 Rebuild
Thanks gents, got it out. Sure enough the little pin fell out onto the rug and took a little searching but I found it. Pulling all the bearings now then I’ll get the seal stuff out.
-
Vossman
- Supporting Member II
- Posts: 262
- Joined: 06:23 pm Jul 24 2017
- Country: USA
Re: 2004 KDX 200 Rebuild
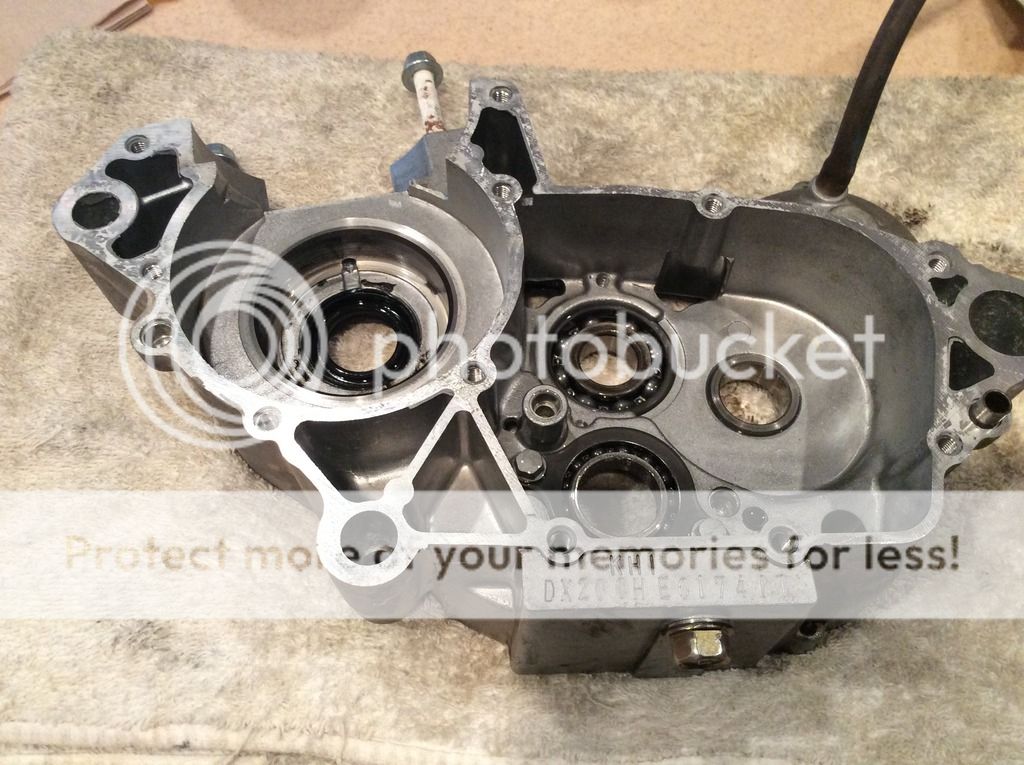
Well, point of no return! Cases split with a good pop, bearing came with the crank so I’ll have to figure how to get that off. Took lot of pics of the gears to help with reassembly.
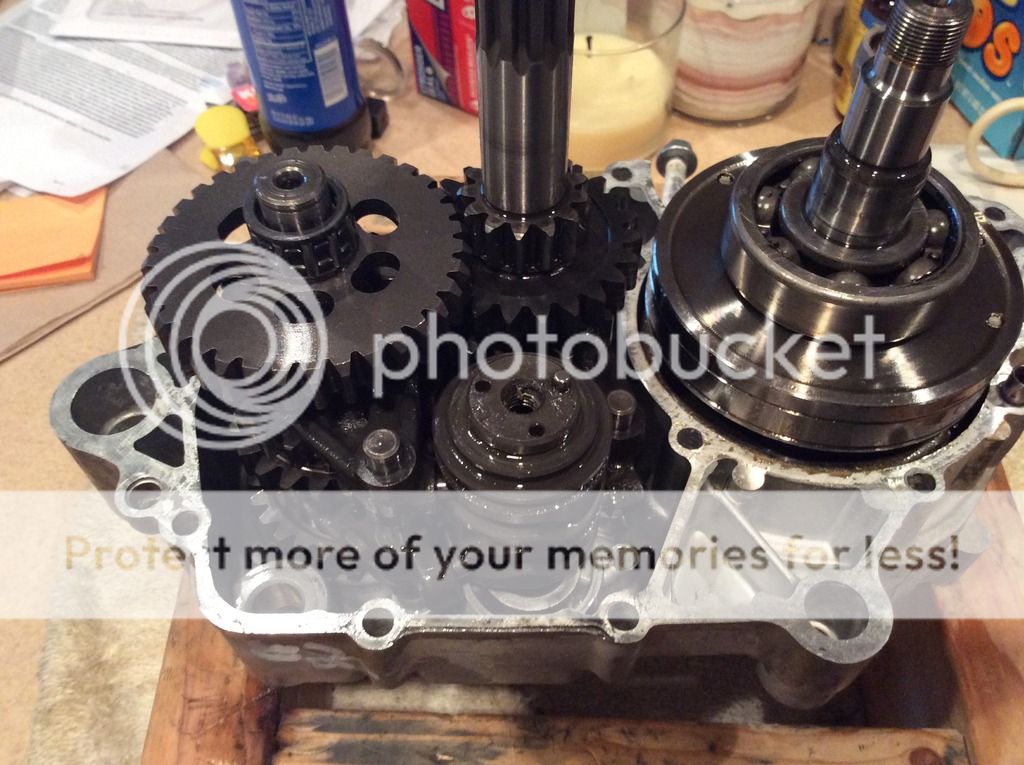

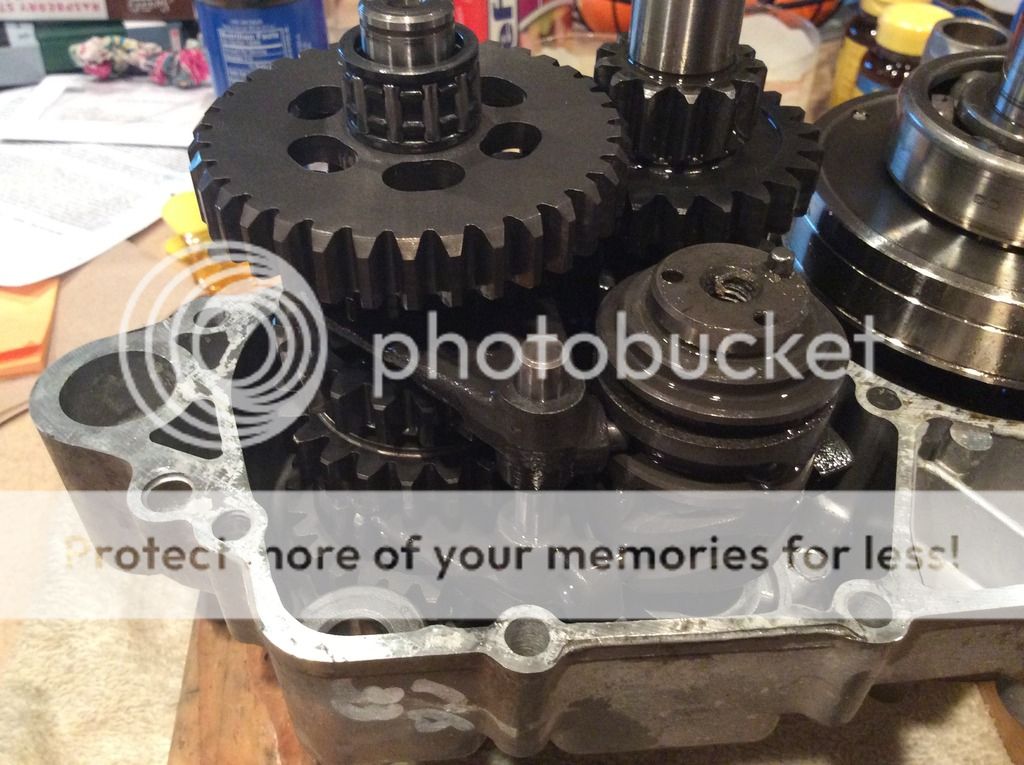
I also found that if your careful you can use the case splitter tool to press out bearings and seals. I liked that better than hammering them out. The little blind bearings are proving to be a challenge to remove. The 8mm puller is just a bit too big to get in there.
I also found that if your careful you can use the case splitter tool to press out bearings and seals. I liked that better than hammering them out. The little blind bearings are proving to be a challenge to remove. The 8mm puller is just a bit too big to get in there.
-
Vossman
- Supporting Member II
- Posts: 262
- Joined: 06:23 pm Jul 24 2017
- Country: USA
Re: 2004 KDX 200 Rebuild
I’m gonna take a break from the motor and do the forks tomorrow. I also got a few pistols I need to work on for a client so I’ll be back in a week or two with a progress update.
If anyone wants to see pics of anything specific while I got the forks or motor apart let me know.
If anyone wants to see pics of anything specific while I got the forks or motor apart let me know.
-
ericr
- Gold Member
- Posts: 246
- Joined: 06:57 pm Nov 06 2017
- Country: USA
- Location: Gig Harbor, WA
Re: 2004 KDX 200 Rebuild
You'll need a bearing splitter to get the crank bearings off. They're a bit pricey. Whoever's doing your crank can get them off. Good work.
'02 KDX 200, '02 KDX 220 - My restoration thread
-
KDXGarage
- KDXRider.net
- Posts: 14060
- Joined: 06:45 am Nov 01 2004
- Country: United States of America
- Location: AL, USA
- Contact:
Re: 2004 KDX 200 Rebuild
Nice work! Fork pic would be great!
Thank you for participating on kdxrider.net.
To post pictures from a device: viewtopic.php?f=88&t=24128
To post pictures from a device: viewtopic.php?f=88&t=24128
-
Vossman
- Supporting Member II
- Posts: 262
- Joined: 06:23 pm Jul 24 2017
- Country: USA
Re: 2004 KDX 200 Rebuild
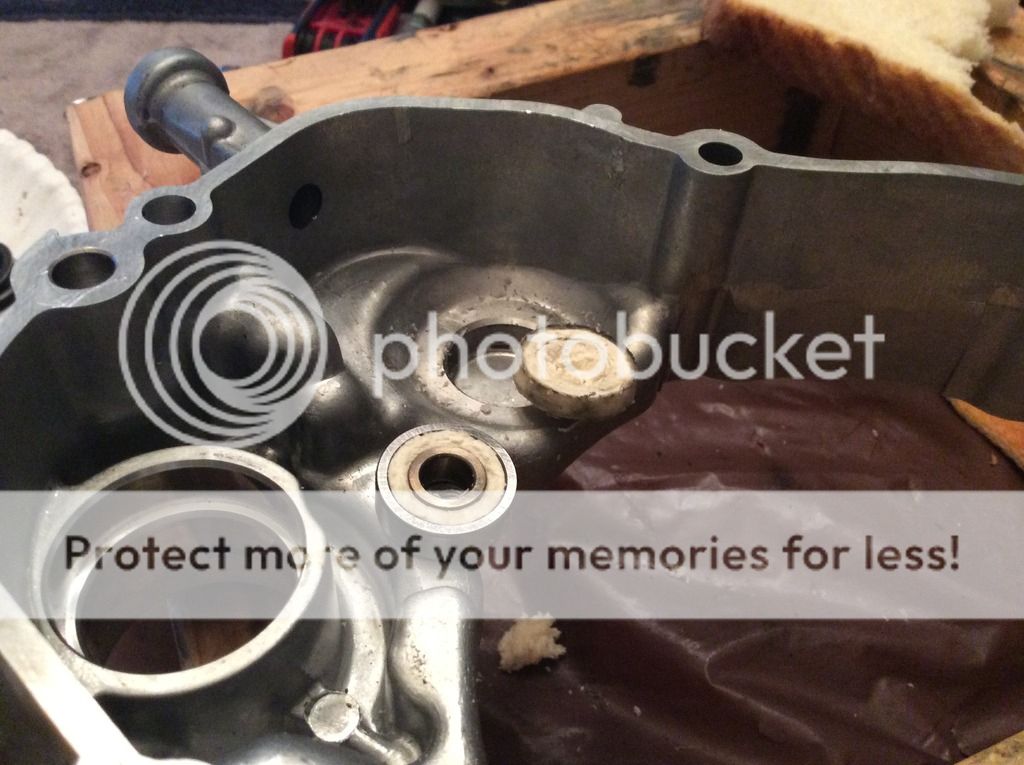
All right, so that one bearing I couldn’t get out really pissed me off. I looked all weekend for a 6mm puller, found a few but they were all $30+ or in a kit.
I heated it with a gas torch, froze multiple sockets and placed them on the bearing to keeep it cold. Bent tools in hopes of getting underneath it to pull it out. I got nothing but a good 2nd degree burn on my leg when I touch the torch end to my leg as I was setting it down. Called the three local shops and asked if they could remove it, one said they’d try but stopped cause he thought he was putting too much stress on the case so took it to 2 machine shops for a last chance with zero luck.
Couple of posts back, Ericr mentions bread. Good old YouTube comes through. https://m.youtube.com/watch?v=cKcGeXxKyvs
Holy crap it worked, took about 5 minutes. Started by stuffing a little Texas Toast down there and tapping it in with a punch. Made sure I had a solid piece to hold the case onto and went to work.
MOVEMENT!
Science is crazy.
-
Vossman
- Supporting Member II
- Posts: 262
- Joined: 06:23 pm Jul 24 2017
- Country: USA
Re: 2004 KDX 200 Rebuild
Thanks Ericr!
-
KDXGarage
- KDXRider.net
- Posts: 14060
- Joined: 06:45 am Nov 01 2004
- Country: United States of America
- Location: AL, USA
- Contact:
Re: 2004 KDX 200 Rebuild
Hell to the yeah. Great job!
Thank you for participating on kdxrider.net.
To post pictures from a device: viewtopic.php?f=88&t=24128
To post pictures from a device: viewtopic.php?f=88&t=24128
-
Vossman
- Supporting Member II
- Posts: 262
- Joined: 06:23 pm Jul 24 2017
- Country: USA
Re: 2004 KDX 200 Rebuild
Most progress has slowed to a crawl. Forks are on hold, needed to order the damper holder from FRP in order to get the inner and outer tubes apart to redo the bushings. Waiting on crank parts before I can send that off and for the frame it’s too dang cold for me to paint.