2004 KDX 200 Rebuild
-
KDXGarage

- KDXRider.net

- Posts: 14747
- Joined: 06:45 am Nov 01 2004
- Country: United States of America
- Location: AL, USA
- Has thanked: 191 times
- Been thanked: 48 times
- Contact:
Re: 2004 KDX 200 Rebuild
RTV the heck out of it. :-) Craigslist solution. :-)
Thank you for participating on kdxrider.net. 
To post pictures from a device: viewtopic.php?f=88&t=24128
To post pictures from a device: viewtopic.php?f=88&t=24128
-
Vossman
- Supporting Member II

- Posts: 262
- Joined: 06:23 pm Jul 24 2017
- Country: USA
Re: 2004 KDX 200 Rebuild
New parts (cover, seals and bearing) are gonna cost about $230 if the heat and rubber mallet don’t work. Expensive lesson but it’s just $$ right?
-
kdxsully
- Supporting Member
- Posts: 739
- Joined: 08:28 am Apr 21 2019
- Country: United States
- Location: North Cackalack
Re: 2004 KDX 200 Rebuild
I second this. I was gonna buy a clutch cover gasket for $17. 29 and some change for the whole engine gasket kit. DUH! Lol.ericr wrote: 11:46 pm Jan 24 2019 It's like Christmas. Pro-taper, renthal - nice stuff you're putting on that bike. Before you buy more individual gaskets though, I would suggest that you buy gasket kits. It'll save you $$'s
Very nice rebuild. The bike was nice to begin with, it'll be a monster by the time you finish.
I like turtles
-
Vossman
- Supporting Member II
- Posts: 262
- Joined: 06:23 pm Jul 24 2017
- Country: USA
-
ericr

- Gold Member

- Posts: 246
- Joined: 06:57 pm Nov 06 2017
- Country: USA
- Location: Gig Harbor, WA
Re: 2004 KDX 200 Rebuild
I was thinking about the bend. Rather than just heat and rubber mallet, I think I'd try to bolt the cover to a stable plate with the bent portion overhanging the edge of the plate. You could then run bolts in the bent portion to gradually apply downward force as you're heating the area. Am I making sense?
'02 KDX 200, '02 KDX 220 - My restoration thread
-
Vossman
- Supporting Member II
- Posts: 262
- Joined: 06:23 pm Jul 24 2017
- Country: USA
Re: 2004 KDX 200 Rebuild
Yes, that makes sense. I have an old school desk that is flat and pretty sturdy. I will use the old gasket to drill the bolt pattern
-
doakley

- Gold Member
- Posts: 1241
- Joined: 02:58 pm Mar 10 2016
- Country:
Re: 2004 KDX 200 Rebuild
I'd go the route of the epoxy repair. I would have no confidence in my ability to precisely bend the hot aluminum. My clutch cover is repaired with JB Weld and has worked well for 4+ years of racing.
-
Kdxfan4130

- Supporting Member II
- Posts: 116
- Joined: 09:24 pm May 30 2019
- Country: Usa
Re: 2004 KDX 200 Rebuild
Just read your entire thread, excellent info and rebuilding pics.
I’ve done worse things than bending that clutch cover, like forgetting coolant rebuilding a top end lol. Only once tho!
I like the idea of bolting it down an try to counter bend it (bend it past being flat so it will flex back to being flat enough to use gasket & sealant if necessary).
Good luck. And keep up the terrific work your documenting, that bread trick was awesome never would of thought of it unless fixing a faucet!
Restore rather than replace
-
Vossman
- Supporting Member II
- Posts: 262
- Joined: 06:23 pm Jul 24 2017
- Country: USA
-
rungrandpa

- Supporting Member I

- Posts: 233
- Joined: 11:35 pm May 26 2018
- Country: U.S.A.
- Has thanked: 1 time
Re: 2004 KDX 200 Rebuild
Me too on the JB Weld. I broke my clutch cover, bought a unit off ebay that was warped. I fixed the old clutch cover with JB Weld and it's held up.doakley wrote: 09:24 pm Jun 11 2019 I'd go the route of the epoxy repair. I would have no confidence in my ability to precisely bend the hot aluminum. My clutch cover is repaired with JB Weld and has worked well for 4+ years of racing.
-
GATOROC

- Gold Member
- Posts: 250
- Joined: 12:25 am Mar 06 2019
- Country: United States
- Location: Colorado Springs, CO
Re: 2004 KDX 200 Rebuild
Thanks for the info on these! I picked up one from Ace the other day and like you said - fits perfectly! I thought I was going to keep the odometer for quite a while, but ended up taking it out.Vossman wrote: 09:14 pm May 05 2019 Been trying to find something to plug the odometer cable hole. Found these at Ace Hardware, they fit well. Snap in pretty easy. I did put a little black RTV to help hold it in. These are made by Hillman, 9/16 was the size.
2000 KDX 220
2004 KDX 200
2024 Beta 300 RR Race Edition
2004 KDX 200
2024 Beta 300 RR Race Edition
-
lucy
- Supporting Member III

- Posts: 203
- Joined: 09:58 am Jan 05 2016
- Country:
- Location: Orlando, Florida
- Been thanked: 1 time
Re: 2004 KDX 200 Rebuild
Do you know what those caps are used for? It might help us find them at other vendors.
-
GATOROC
- Gold Member
- Posts: 250
- Joined: 12:25 am Mar 06 2019
- Country: United States
- Location: Colorado Springs, CO
Re: 2004 KDX 200 Rebuild
If you Google "Hillman 9/16 hole plug" you'll see them from different vendors. The issue I see is that a lot of them sell in bulk. I picked mine up for 59 cents each at Ace Hardware.
 Hillman 9-16 Hole Plug 1, on Flickr
 Hillman 9-16 Hole Plug 2 , on Flickr
Hillman 9-16 Hole Plug 1, on FlickrHillman 9-16 Hole Plug 2 , on Flickr2000 KDX 220
2004 KDX 200
2024 Beta 300 RR Race Edition
2004 KDX 200
2024 Beta 300 RR Race Edition
-
kdxsully
- Supporting Member
- Posts: 739
- Joined: 08:28 am Apr 21 2019
- Country: United States
- Location: North Cackalack
Re: 2004 KDX 200 Rebuild
Good intel, I think Lowe’s has those. I’ll look later. I think using these speedo gears as a wheel spacer is silly, but whaaaatever. Did you just cut the wire? I’d rather try and unsolder the wires or something so I can put it back on if I need toGATOROC wrote: 09:16 am Jun 23 2019 If you Google "Hillman 9/16 hole plug" you'll see them from different vendors. The issue I see is that a lot of them sell in bulk. I picked mine up for 59 cents each at Ace Hardware.
I like turtles
-
GATOROC
- Gold Member
- Posts: 250
- Joined: 12:25 am Mar 06 2019
- Country: United States
- Location: Colorado Springs, CO
Re: 2004 KDX 200 Rebuild
I'm glad that Vossman provided the part to make this easy. Like he said, pop in the plug and put a little black RTV to help keep it in place and provide a seal.kdxsully wrote: 10:31 am Jun 23 2019 Good intel, I think Lowe’s has those. I’ll look later. I think using these speedo gears as a wheel spacer is silly, but whaaaatever. Did you just cut the wire? I’d rather try and unsolder the wires or something so I can put it back on if I need to
I'm not quite sure what your saying about "unsoldering the wires". The process is to simply unscrew the screw that holds the odometer cable to the wheel, pull it out, disconnect the odometer cable guide from the fork tube, and disconnect the odometer from the handle bar mount. It takes about 5-10 minutes to do. I bagged all of my parts together so that I can reinstall at a later date if I decide to, which probably won't happen.
2000 KDX 220
2004 KDX 200
2024 Beta 300 RR Race Edition
2004 KDX 200
2024 Beta 300 RR Race Edition
-
kdxsully
- Supporting Member
- Posts: 739
- Joined: 08:28 am Apr 21 2019
- Country: United States
- Location: North Cackalack
Re: 2004 KDX 200 Rebuild
Is there a plug? That wire has to connect to that little computer board in there somehow. It’s been a while since I had mine open. I’m glad it’s as easy as that though.GATOROC wrote: 11:00 am Jun 23 2019I'm glad that Vossman provided the part to make this easy. Like he said, pop in the plug and put a little black RTV to help keep it in place and provide a seal.kdxsully wrote: 10:31 am Jun 23 2019 Good intel, I think Lowe’s has those. I’ll look later. I think using these speedo gears as a wheel spacer is silly, but whaaaatever. Did you just cut the wire? I’d rather try and unsolder the wires or something so I can put it back on if I need to
I'm not quite sure what your saying about "unsoldering the wires". The process is to simply unscrew the screw that holds the odometer cable to the wheel, pull it out, disconnect the odometer cable guide from the fork tube, and disconnect the odometer from the handle bar mount. It takes about 5-10 minutes to do. I bagged all of my parts together so that I can reinstall at a later date if I decide to, which probably won't happen.I will most likely go with a Voyager or something similar that has a lot more features.
I like turtles
-
Vossman
- Supporting Member II
- Posts: 262
- Joined: 06:23 pm Jul 24 2017
- Country: USA
Re: 2004 KDX 200 Rebuild
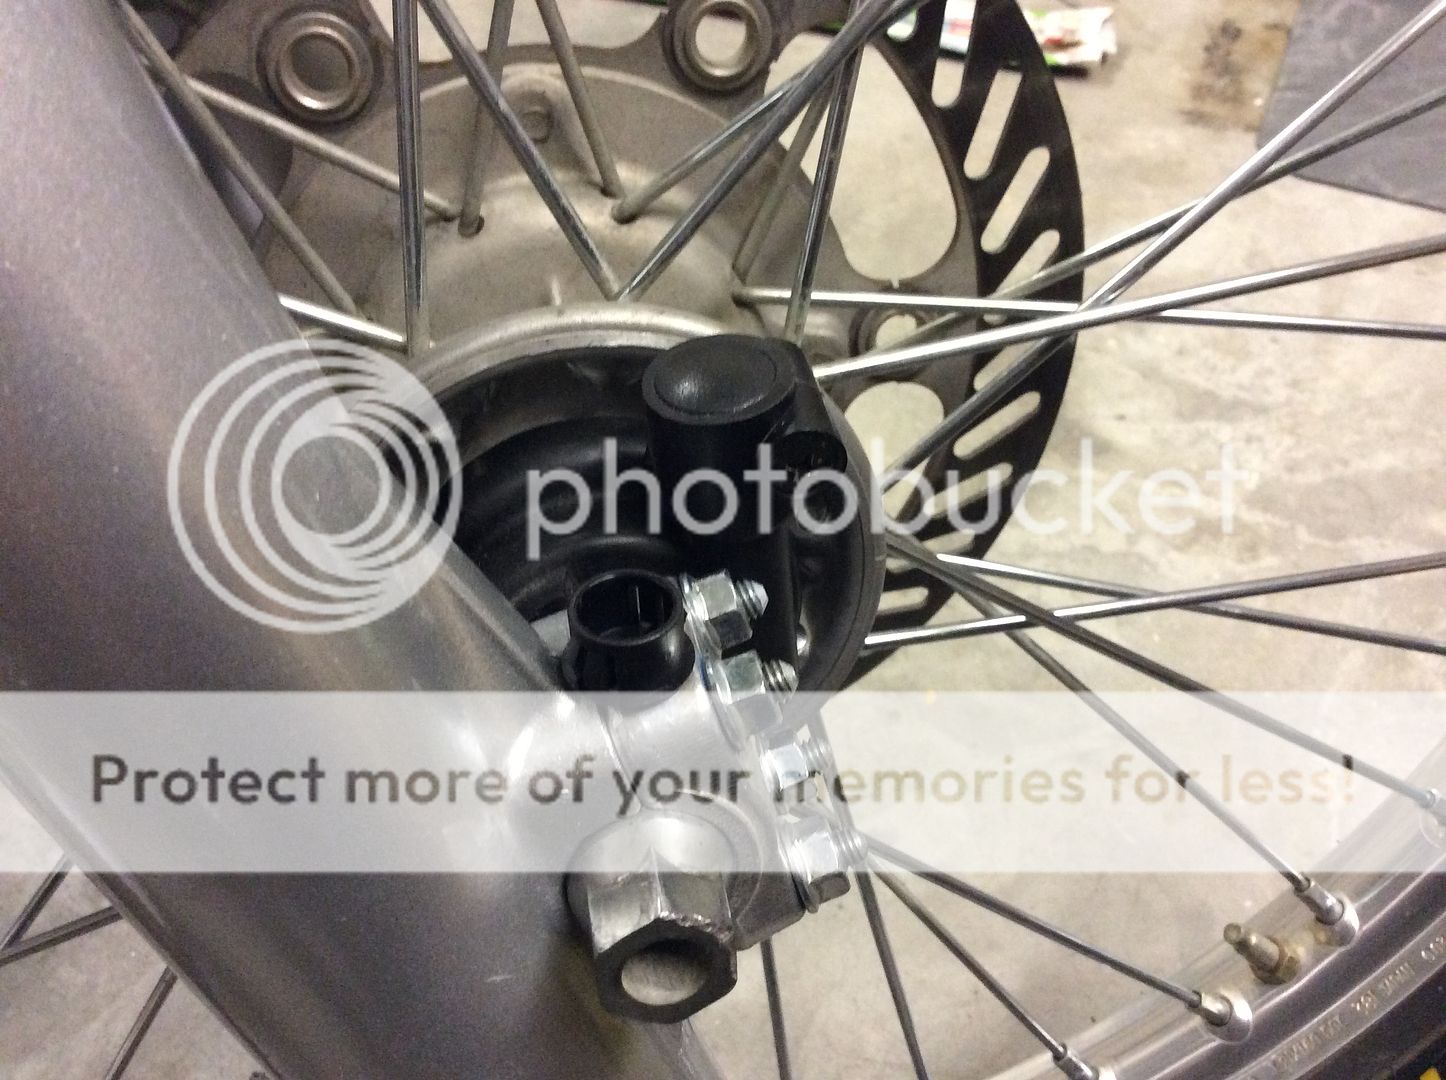
Completely mechanical setup. The hub has a screw drive that turns the inner cable that goes to the trip meter.
I just cleaned my hub, put more grease in it and plugged it.
I just cleaned my hub, put more grease in it and plugged it.
-
KDXGarage
- KDXRider.net
- Posts: 14747
- Joined: 06:45 am Nov 01 2004
- Country: United States of America
- Location: AL, USA
- Has thanked: 191 times
- Been thanked: 48 times
- Contact:
Re: 2004 KDX 200 Rebuild
kdxsully, 1989 and newer are mechanical, not like yours.
Thank you for participating on kdxrider.net.
To post pictures from a device: viewtopic.php?f=88&t=24128
To post pictures from a device: viewtopic.php?f=88&t=24128
-
kdxsully
- Supporting Member
- Posts: 739
- Joined: 08:28 am Apr 21 2019
- Country: United States
- Location: North Cackalack
-
kdxsully
- Supporting Member
- Posts: 739
- Joined: 08:28 am Apr 21 2019
- Country: United States
- Location: North Cackalack
Re: 2004 KDX 200 Rebuild
Got around to doing this on my ‘87.
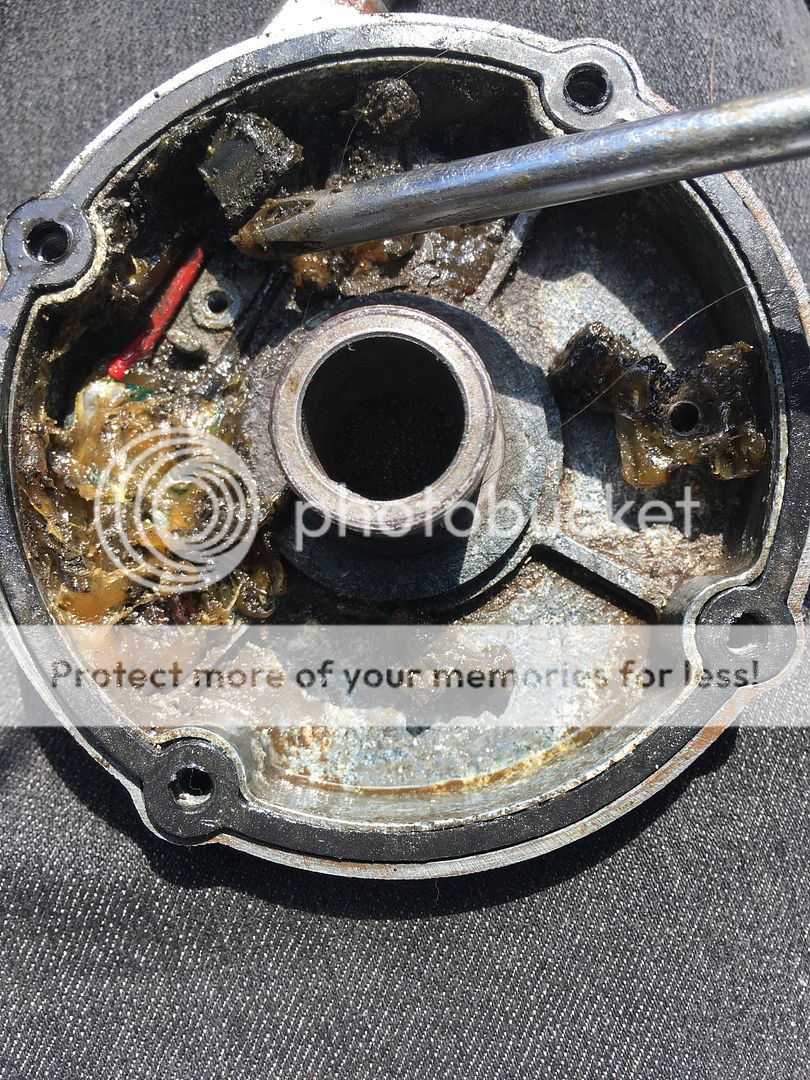
Take it apart, start removing the computer boogers (my magnet fell out of the spinner thing, don’t mind it).
This’ll show you where the wires and stuff are so you won’t break anything. Mine was dirty so I couldn’t see anything at all through the gunk. There’s a plate that sits on top of the wires, you’ll have to unscrew the screw holding it in and take it out first. You can see the hole where the plate was.
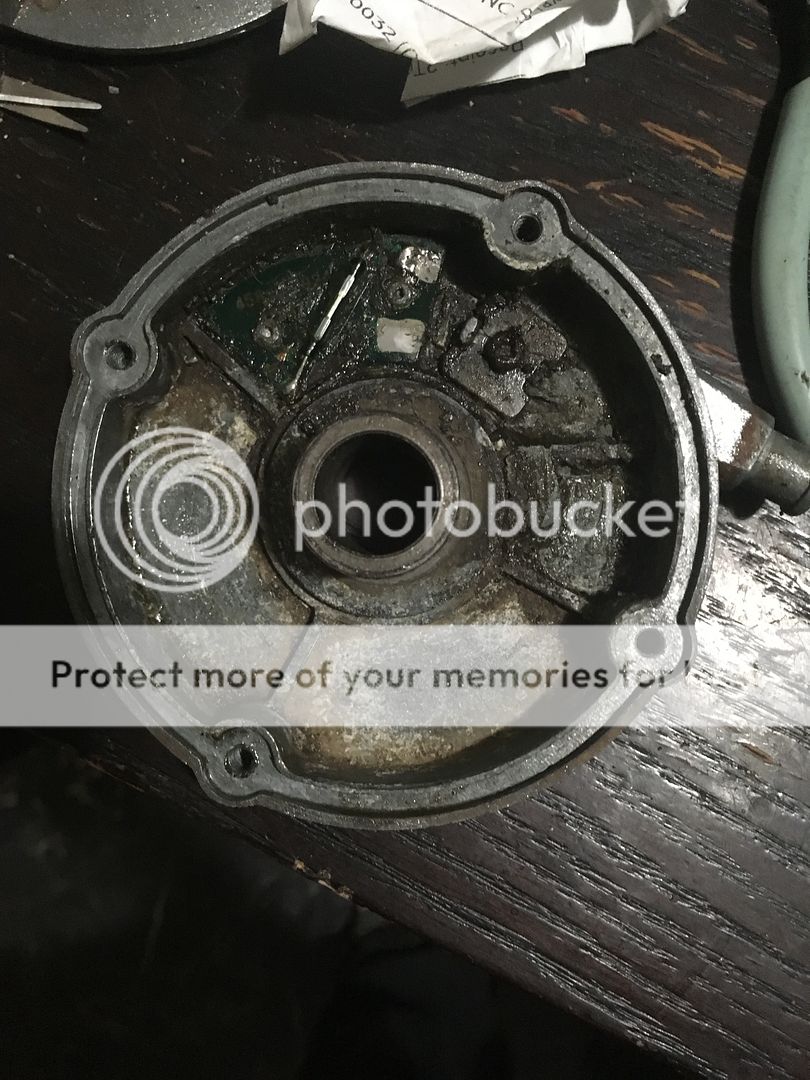
Make sure you remove as much boogers as you can, they dissipate the heat you need to melt the solder on the circuit board. Press your iron on the contacts and gently pry up with a flathead at the same time; it’ll take a little bit.
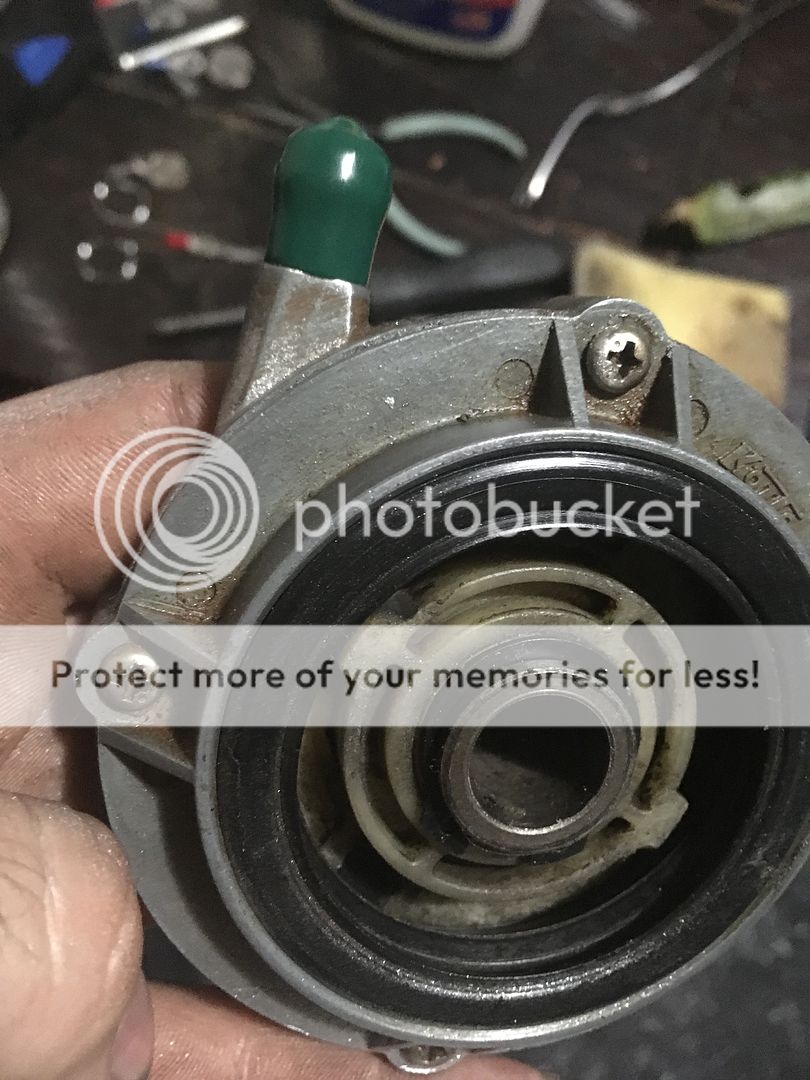
Replace your parts, cap the hole with a 3/8” rubber screw cap. Use a little silicon at the base for added sealing (I didn’t though). Really simple little job for a lot of cosmetic gain.
Take it apart, start removing the computer boogers (my magnet fell out of the spinner thing, don’t mind it).
This’ll show you where the wires and stuff are so you won’t break anything. Mine was dirty so I couldn’t see anything at all through the gunk. There’s a plate that sits on top of the wires, you’ll have to unscrew the screw holding it in and take it out first. You can see the hole where the plate was.
Make sure you remove as much boogers as you can, they dissipate the heat you need to melt the solder on the circuit board. Press your iron on the contacts and gently pry up with a flathead at the same time; it’ll take a little bit.
Replace your parts, cap the hole with a 3/8” rubber screw cap. Use a little silicon at the base for added sealing (I didn’t though). Really simple little job for a lot of cosmetic gain.
I like turtles