'86 - Down the Rabbit Hole
-
KDXGarage

- KDXRider.net

- Posts: 14060
- Joined: 06:45 am Nov 01 2004
- Country: United States of America
- Location: AL, USA
- Contact:
Re: '86 - Down the Rabbit Hole
Yes, indeed. I would suggest one consider researching safety goggles / side shields. While doing my buddy's 2007 YZ250 shock, I got shock oil in my eyes while wearing safety glasses. Fun times.
Thank you for participating on kdxrider.net. 
To post pictures from a device: viewtopic.php?f=88&t=24128
To post pictures from a device: viewtopic.php?f=88&t=24128
-
Clatter
- Supporting Member II

- Posts: 43
- Joined: 05:23 pm Feb 06 2019
- Country: US
Re: '86 - Down the Rabbit Hole
Oh, yeah.. Just having safety glasses isn't enough sometimes;
Use a face shield.
Have had to get stuff dug out of my eyes while wearing just glasses on a few occasions now.
Real men don't go to the eye doctor, just get a pair of tweezers and….!
Just another reason to cuss and throw tools!
Speaking of cussing and throwing tools...
The stupidest little details keep hanging me up, again and again..
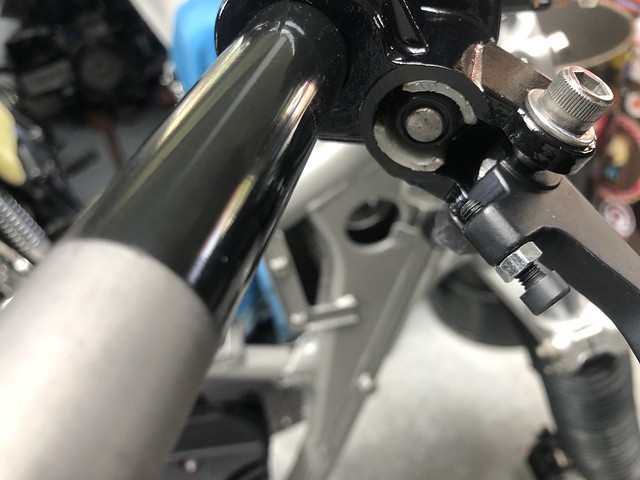
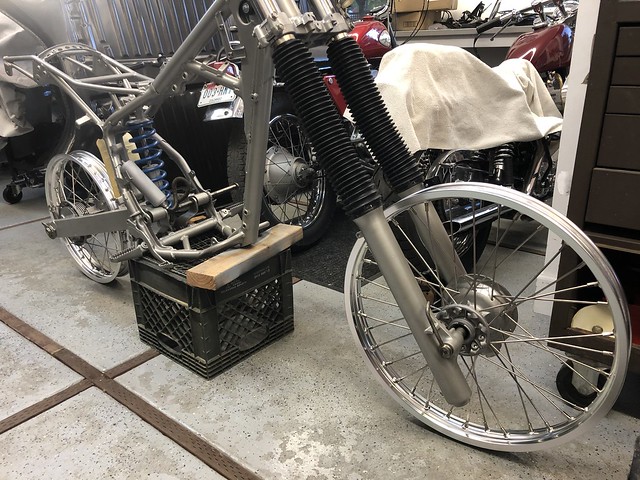
Here, the brake line isn't the overall wrong length, it's that the housing and clamp area are in the wrong place.


That makes it so things just don't work up top..

Took a bunch of measurements and pics and sent them to the manufacturer,
Hopefully they will work with me on this one to get the right brake line.
Still.. PITA...
You will also see that there is a rebuilt caliper in the pics there.
The caliper rebuild kit was actually complete, and worked well.
Took me a few tries to get the puzzle assembled correctly using pics in the book.
When things sit apart for months, and you don't have one similar to compare to,
it gets a bit, um, confusing..
Master cylinder rebuild got me howling in frustration!!

First, like always, ebay vendors are more than happy to sell you the wrong stuff.
All Balls rebuild kit is '89-up (as always).
I could use a couple of parts from it, like the boot and whatnot, but, of course, the crucial wear part, the o-ring, wasn't there.
The OG ring was save-able, along with most of the parts still there.
Cleaning out the inside with brake cleaner made the paint sticky and messed it up.
Finally ended up sanding down the little retainer clip to make it even fit together
(After prying and cussing and skinning my knuckles and scratching the paint).
The kit didn't include the cover seal, which was the thing i really needed most.
Finally, what was the real kick in the nuts was the lever.
You would think that you could just order a lever and bolt it on, right?
Nnooo.. Has to be a long painful dilemma..
I woulda been happy to keep the old lever, but it was missing the travel adjuster stops - both 'in' and 'out'.

Plus, the pivot hole was all wallered out because the PO had a screw in there instead of a shoulder bolt.
So, i got this other lever, and the return spring hole was too small, so i drilled it out,
And then the spring shot across the shop, to be lost forever..
Worst thing is, the reach from the lever isn't right to the master pushrod
(Even if i could drill/tap it for an extension stop)..
Anyways, really, really, really frustrating work session..
I'm fully understanding now why nobody would ever restore a bike of this vintage.
Something simple like "I need a brake lever for an '86 KDX200" turns into this huge ordeal.
Parts aren't available, and what parts are available, are the wrong ones!
And that sure doesn't stop people from taking your money for them...
We'll eventually get this front brake working.. We will.. We will..
Even if it takes 50 hours!
Er, wait, make that 60..!

Use a face shield.
Have had to get stuff dug out of my eyes while wearing just glasses on a few occasions now.
Real men don't go to the eye doctor, just get a pair of tweezers and….!
Just another reason to cuss and throw tools!
Speaking of cussing and throwing tools...
The stupidest little details keep hanging me up, again and again..
Here, the brake line isn't the overall wrong length, it's that the housing and clamp area are in the wrong place.
That makes it so things just don't work up top..
Took a bunch of measurements and pics and sent them to the manufacturer,
Hopefully they will work with me on this one to get the right brake line.
Still.. PITA...
You will also see that there is a rebuilt caliper in the pics there.
The caliper rebuild kit was actually complete, and worked well.
Took me a few tries to get the puzzle assembled correctly using pics in the book.
When things sit apart for months, and you don't have one similar to compare to,
it gets a bit, um, confusing..
Master cylinder rebuild got me howling in frustration!!
First, like always, ebay vendors are more than happy to sell you the wrong stuff.
All Balls rebuild kit is '89-up (as always).
I could use a couple of parts from it, like the boot and whatnot, but, of course, the crucial wear part, the o-ring, wasn't there.
The OG ring was save-able, along with most of the parts still there.
Cleaning out the inside with brake cleaner made the paint sticky and messed it up.
Finally ended up sanding down the little retainer clip to make it even fit together
(After prying and cussing and skinning my knuckles and scratching the paint).
The kit didn't include the cover seal, which was the thing i really needed most.
Finally, what was the real kick in the nuts was the lever.
You would think that you could just order a lever and bolt it on, right?
Nnooo.. Has to be a long painful dilemma..
I woulda been happy to keep the old lever, but it was missing the travel adjuster stops - both 'in' and 'out'.
Plus, the pivot hole was all wallered out because the PO had a screw in there instead of a shoulder bolt.
So, i got this other lever, and the return spring hole was too small, so i drilled it out,
And then the spring shot across the shop, to be lost forever..
Worst thing is, the reach from the lever isn't right to the master pushrod
(Even if i could drill/tap it for an extension stop)..
Anyways, really, really, really frustrating work session..
I'm fully understanding now why nobody would ever restore a bike of this vintage.
Something simple like "I need a brake lever for an '86 KDX200" turns into this huge ordeal.
Parts aren't available, and what parts are available, are the wrong ones!
And that sure doesn't stop people from taking your money for them...
We'll eventually get this front brake working.. We will.. We will..
Even if it takes 50 hours!
Er, wait, make that 60..!
-
KDXGarage
- KDXRider.net
- Posts: 14060
- Joined: 06:45 am Nov 01 2004
- Country: United States of America
- Location: AL, USA
- Contact:
Re: '86 - Down the Rabbit Hole
Good luck with it, or improved luck.
Suddenly, I am even gladder to have my KDX hoard.
Suddenly, I am even gladder to have my KDX hoard.
Thank you for participating on kdxrider.net.
To post pictures from a device: viewtopic.php?f=88&t=24128
To post pictures from a device: viewtopic.php?f=88&t=24128
-
Clatter
- Supporting Member II
- Posts: 43
- Joined: 05:23 pm Feb 06 2019
- Country: US
Re: '86 - Down the Rabbit Hole
The quest for parts continues to grind along..
Anyhow, I'm on to doing something possible..
Really love my blasting cabinet, now that it is all sorted.


it's looking like spokes might be hard to come by?
Hope this doesn't all just come to a dead end because of no spokes.
Anyone know where to look to match up some spokes?
Anyhow, I'm on to doing something possible..
Really love my blasting cabinet, now that it is all sorted.
it's looking like spokes might be hard to come by?
Hope this doesn't all just come to a dead end because of no spokes.
Anyone know where to look to match up some spokes?
-
KDXGarage
- KDXRider.net
- Posts: 14060
- Joined: 06:45 am Nov 01 2004
- Country: United States of America
- Location: AL, USA
- Contact:
Re: '86 - Down the Rabbit Hole
Have you tried Buchanan?
Man! Those hubs look great.
Man! Those hubs look great.
Thank you for participating on kdxrider.net.
To post pictures from a device: viewtopic.php?f=88&t=24128
To post pictures from a device: viewtopic.php?f=88&t=24128
-
ericr
- Gold Member

- Posts: 246
- Joined: 06:57 pm Nov 06 2017
- Country: USA
- Location: Gig Harbor, WA
Re: '86 - Down the Rabbit Hole
That looks really good. If you are not going to have the hubs painted/coated, I'd suggest Protectaclear. I used it on my raw aluminum and it's holding up well.
After spending untold hours trying to cross reference spoke lengths for Tusk and others, I gave up and ordered from Buchanan. It's a bit pricey, but they'll send you exactly what you need.
After spending untold hours trying to cross reference spoke lengths for Tusk and others, I gave up and ordered from Buchanan. It's a bit pricey, but they'll send you exactly what you need.
'02 KDX 200, '02 KDX 220 - My restoration thread
-
Clatter
- Supporting Member II
- Posts: 43
- Joined: 05:23 pm Feb 06 2019
- Country: US
Re: '86 - Down the Rabbit Hole
Awlright.. Things are grinding along...
The petty brake fittings and pieces all eventually showed up on evilbay.
Getting the correct part numbers from partzilla, and plugging them into the evil search can net some results.
-Sometimes- the correct parts will actually arrive(!)
Got all of those fiddly little brake lever pieces NOS one at a time over the course of weeks..
Greg at Off-Road Innovation also took the time to dig and find a bunch of little stuff as well.
Big thanks to Greg!
He sent a selection of spokes that should be going into place a week or two.
Also said the crank/rod was done and shipping..
The front brake line was made at Galfer USA and sold on ebay (of course ),
),
But unlike these other vendors, they made right, and shipped me a correct line fee of charge.

Additionally,
Another ebay vendor oem.replica made up a seat cover.
They didn't have any correct covers for the '86 KDX200, but were willing to make one if given an example.
I sent an OG tattered one off of the bay all the way across the world, and got back this cover.
It's 100% correct as far as i can tell.

The upholstery shop put a little bit of extra pad around the perimeter fo the seat pan,
And made it look kind of 'puffy',
But it should look OK when the whole thing is assembled and broken in a bit.
We'll have to ride the thing and see..
Hopefully, we'll have a little segment on motor assembly and wheel lacing in the next coulple of weeks..
The petty brake fittings and pieces all eventually showed up on evilbay.
Getting the correct part numbers from partzilla, and plugging them into the evil search can net some results.
-Sometimes- the correct parts will actually arrive(!)
Got all of those fiddly little brake lever pieces NOS one at a time over the course of weeks..
Greg at Off-Road Innovation also took the time to dig and find a bunch of little stuff as well.
Big thanks to Greg!
He sent a selection of spokes that should be going into place a week or two.
Also said the crank/rod was done and shipping..
The front brake line was made at Galfer USA and sold on ebay (of course
But unlike these other vendors, they made right, and shipped me a correct line fee of charge.
Additionally,
Another ebay vendor oem.replica made up a seat cover.
They didn't have any correct covers for the '86 KDX200, but were willing to make one if given an example.
I sent an OG tattered one off of the bay all the way across the world, and got back this cover.
It's 100% correct as far as i can tell.
The upholstery shop put a little bit of extra pad around the perimeter fo the seat pan,
And made it look kind of 'puffy',
But it should look OK when the whole thing is assembled and broken in a bit.
We'll have to ride the thing and see..
Hopefully, we'll have a little segment on motor assembly and wheel lacing in the next coulple of weeks..
-
kdxsully
- Supporting Member
- Posts: 739
- Joined: 08:28 am Apr 21 2019
- Country: United States
- Location: North Cackalack
Re: '86 - Down the Rabbit Hole
Love it.
Off Road Innovation is a staple in the market for these air cooleds. They’ve got so much cool stuff that doesn’t exist anymore. Good to know they can gather up the spokes needed.
I saw ORI sells a remanufactured crank for these bikes too, super cool.
How much did it cost to get that seat done, if you don’t mind? It looks phenomenal.
I like turtles
-
KDXGarage
- KDXRider.net
- Posts: 14060
- Joined: 06:45 am Nov 01 2004
- Country: United States of America
- Location: AL, USA
- Contact:
Re: '86 - Down the Rabbit Hole
HECK YEAH!! Back at it!
The extra roundness on the seat might be quite helpful!
Here's a link with a couple of '86 pics.
https://www.motorcyclespecs.co.za/model ... 0%2086.htm
The seat really looks good. I think I bought a seat cover from them for a 1987 KX250.
The extra roundness on the seat might be quite helpful!
Here's a link with a couple of '86 pics.
https://www.motorcyclespecs.co.za/model ... 0%2086.htm
The seat really looks good. I think I bought a seat cover from them for a 1987 KX250.
Thank you for participating on kdxrider.net.
To post pictures from a device: viewtopic.php?f=88&t=24128
To post pictures from a device: viewtopic.php?f=88&t=24128
-
Clatter
- Supporting Member II
- Posts: 43
- Joined: 05:23 pm Feb 06 2019
- Country: US
Re: '86 - Down the Rabbit Hole
Seat cover got created by buying one on ebay and sending it across the pond to be copied.
The guy doing them wanted an example to copy and start selling;
He was willing to do the first one for free if i provided a decent OEM seat.
So that cost around $40 on ebay, and then $50 to ship it out.
He made the cover for me and shipped it here gratis..
A local upholstery shop used the existing good seat foam and charged me $40 to install the cover.
It coulda been done here by me if i had a power stapler,
but,
Since all i had was a spring-type, the staples weren't relly sinking home.
-
KDXGarage
- KDXRider.net
- Posts: 14060
- Joined: 06:45 am Nov 01 2004
- Country: United States of America
- Location: AL, USA
- Contact:
Re: '86 - Down the Rabbit Hole
Awesome job on the seat cover and the effort, time and money you out into it (and the rest of the bike)!
Thank you for participating on kdxrider.net.
To post pictures from a device: viewtopic.php?f=88&t=24128
To post pictures from a device: viewtopic.php?f=88&t=24128
-
Clatter
- Supporting Member II
- Posts: 43
- Joined: 05:23 pm Feb 06 2019
- Country: US
Lacing Wheels
Spokes came in from ORI..
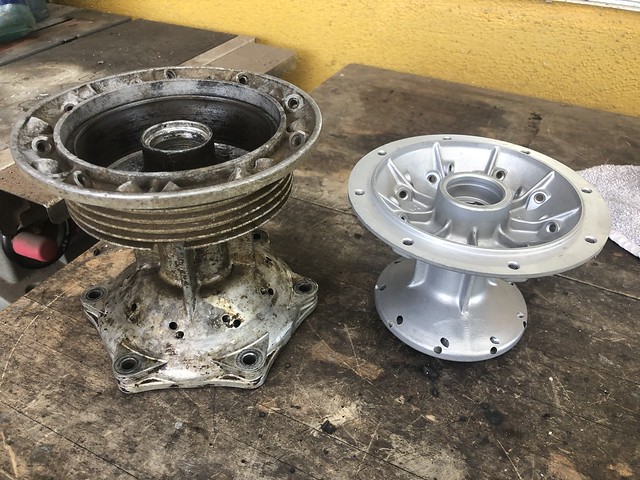
Thought I'd take some suggestion, and coat the hubs to try and keep them clean(er) for long(er).
Had a can of POR stuff, and figured it would be worth a try..

Stuff is supposed to be brushed on, but can be sprayed..

They say it will lay down flat with no brush marks.. Not too sure about that one..

A couple of days later, however, i can say that it has been laying down a bit more since it first went on.
Applying stuff with a brush.. Um.. Yeah.. A Brush...
Because the stuff got into some spoke holes, i dove right in to lacing before the goo got too hard.

Came up short ONE spoke nipple(!)
Also, the holes in these cheapie China ebay rims were too small;
Had to drill every hole over a size before the nipples would go in and turn smoothly.
Also added a slight chamfer to get them to seat tighter/better.
Sucks when you have to work on parts a bunch to get them to fit.
But that didn't stop me from spending a little time on tighten/true..
No harm in using the bike as a truing stand, right?

Was able to take out the hop pretty well - rims are fairly round.
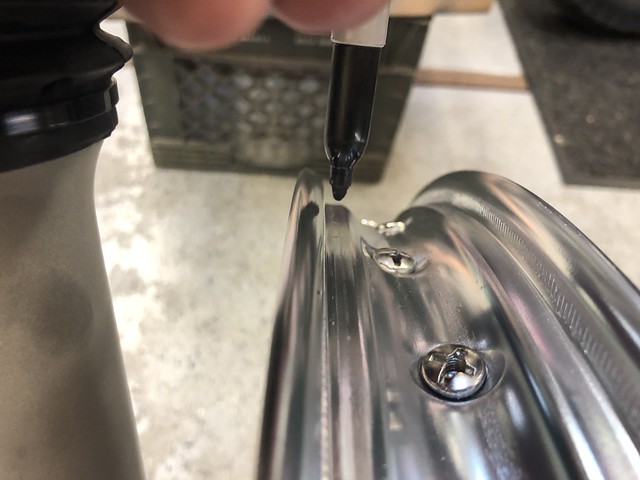
This was pretty frustrating.. Side-to-side on these is lumpy lumpy!
[
Was chasing my tail back-and-forth for a good while before i realized that there were pen marks on -both- sides of the SAME place on the wheel!
No wonder i couldn't get it more true..! It was a wide spot in the rim.
Like it landed off a big jump on a hard surface with a flat tire..
So,
It was as true as physically able adjusting with spokes.
Made sure they were all snugged up and called it good..
New sprocket and rotor torqued down with some anti-seize,
New bearings/seals and plated axles/adjusters/nuts, etc.

Wheels ready to go to our local shop for tires/tubes/strips,
A spoke nipple,
And maybe double-check my truing work..?
Thought I'd take some suggestion, and coat the hubs to try and keep them clean(er) for long(er).
Had a can of POR stuff, and figured it would be worth a try..
Stuff is supposed to be brushed on, but can be sprayed..
They say it will lay down flat with no brush marks.. Not too sure about that one..
A couple of days later, however, i can say that it has been laying down a bit more since it first went on.
Applying stuff with a brush.. Um.. Yeah.. A Brush...
Because the stuff got into some spoke holes, i dove right in to lacing before the goo got too hard.
Came up short ONE spoke nipple(!)
Also, the holes in these cheapie China ebay rims were too small;
Had to drill every hole over a size before the nipples would go in and turn smoothly.
Also added a slight chamfer to get them to seat tighter/better.
Sucks when you have to work on parts a bunch to get them to fit.
But that didn't stop me from spending a little time on tighten/true..
No harm in using the bike as a truing stand, right?
Was able to take out the hop pretty well - rims are fairly round.
This was pretty frustrating.. Side-to-side on these is lumpy lumpy!
[
Was chasing my tail back-and-forth for a good while before i realized that there were pen marks on -both- sides of the SAME place on the wheel!
No wonder i couldn't get it more true..! It was a wide spot in the rim.
Like it landed off a big jump on a hard surface with a flat tire..
So,
It was as true as physically able adjusting with spokes.
Made sure they were all snugged up and called it good..
New sprocket and rotor torqued down with some anti-seize,
New bearings/seals and plated axles/adjusters/nuts, etc.
Wheels ready to go to our local shop for tires/tubes/strips,
A spoke nipple,
And maybe double-check my truing work..?
-
KDXGarage
- KDXRider.net
- Posts: 14060
- Joined: 06:45 am Nov 01 2004
- Country: United States of America
- Location: AL, USA
- Contact:
Re: '86 - Down the Rabbit Hole
A ton of work done on those, too!
If I may make a suggestion, take off the rotor and sprocket. Red Loc-tite on rotor bolts and blue on the sprocket bolts (including blue on the tapered portion under the head.
If I may make a suggestion, take off the rotor and sprocket. Red Loc-tite on rotor bolts and blue on the sprocket bolts (including blue on the tapered portion under the head.
Thank you for participating on kdxrider.net.
To post pictures from a device: viewtopic.php?f=88&t=24128
To post pictures from a device: viewtopic.php?f=88&t=24128
-
Clatter
- Supporting Member II
- Posts: 43
- Joined: 05:23 pm Feb 06 2019
- Country: US
Re: '86 - Down the Rabbit Hole
Thanks for the suggestion; will do.
You'll see an antique Harley and a BSA in the background;
That's where the anti-seize idea comes from - you'll never get that old junk apart otherwise!
You'll see an antique Harley and a BSA in the background;
That's where the anti-seize idea comes from - you'll never get that old junk apart otherwise!
-
KDXGarage
- KDXRider.net
- Posts: 14060
- Joined: 06:45 am Nov 01 2004
- Country: United States of America
- Location: AL, USA
- Contact:
Re: '86 - Down the Rabbit Hole
I know from the factory, it is red loctite.
Heat them up before removal is a dealer tech tip.
I was unable to see the bikes. My eyes were watery from seeing the Craftsman cabinets again, especially the gray with black drawers. :-) HA HA
Heat them up before removal is a dealer tech tip.
I was unable to see the bikes. My eyes were watery from seeing the Craftsman cabinets again, especially the gray with black drawers. :-) HA HA
Thank you for participating on kdxrider.net.
To post pictures from a device: viewtopic.php?f=88&t=24128
To post pictures from a device: viewtopic.php?f=88&t=24128
-
kdxsully
- Supporting Member
- Posts: 739
- Joined: 08:28 am Apr 21 2019
- Country: United States
- Location: North Cackalack
Re: '86 - Down the Rabbit Hole
I put blue on my rotor because, 1. It’s not new, and 2. I had to drill out EVERY screw and had to tap a couple. I’ll keep an eye on them for sure, and hopefully red isn’t absolutely necessary. If they do back out, I’ll use red. Just don’t wanna go through that again when I do change the rotor
I like turtles
-
KDXGarage
- KDXRider.net
- Posts: 14060
- Joined: 06:45 am Nov 01 2004
- Country: United States of America
- Location: AL, USA
- Contact:
Re: '86 - Down the Rabbit Hole
HA! I hear you.
Thank you for participating on kdxrider.net.
To post pictures from a device: viewtopic.php?f=88&t=24128
To post pictures from a device: viewtopic.php?f=88&t=24128
-
Clatter
- Supporting Member II
- Posts: 43
- Joined: 05:23 pm Feb 06 2019
- Country: US
Six Months later..
Six months after I found out the rod was wrong, I finally got back into the saddle.

Never showed my home-made 'case splitter tool' before..
It's a piece of angle with a couple of holes drilled in it,
A couple pieces of M6 all-thread, and a couple of nuts.
Works as good as anything, and why not?

Did the whole drill as before;
The crank went into the freezer, and the cases into the oven at 200F.
Once the first side is on, and things are assembled,
I used a bag of frozen peas to cool/shrink the shaft
(very important to use peas, and not corn, or some other frozen vegetable medley).

Because dirt-bike guys seem to get all freaked out otherwise,
I went ahead and used Yamabond.
Never knew this was so important..!
Now, I'm wondering if the thing being a Kwak and not a Yammer won't cause other issues?

Did things the same as before, only with a rod the actual correct size this time,
And the aforementioned Yamabond, (of course)..

So that takes me back to where i was before this whole rod debacle tripped me up.
We'll be doing some more tomorrow..
Feels good to be back at it again!
Never showed my home-made 'case splitter tool' before..
It's a piece of angle with a couple of holes drilled in it,
A couple pieces of M6 all-thread, and a couple of nuts.
Works as good as anything, and why not?
Did the whole drill as before;
The crank went into the freezer, and the cases into the oven at 200F.
Once the first side is on, and things are assembled,
I used a bag of frozen peas to cool/shrink the shaft
(very important to use peas, and not corn, or some other frozen vegetable medley).
Because dirt-bike guys seem to get all freaked out otherwise,
I went ahead and used Yamabond.
Never knew this was so important..!
Now, I'm wondering if the thing being a Kwak and not a Yammer won't cause other issues?
Did things the same as before, only with a rod the actual correct size this time,
And the aforementioned Yamabond, (of course)..
So that takes me back to where i was before this whole rod debacle tripped me up.
We'll be doing some more tomorrow..
Feels good to be back at it again!
-
kdxsully
- Supporting Member
- Posts: 739
- Joined: 08:28 am Apr 21 2019
- Country: United States
- Location: North Cackalack
Re: '86 - Down the Rabbit Hole
Setbacks can really hurt your morale on a project, but the only medicine is to soldier on!
Maybe when you’re done it’ll be worth $3800 like that guy’s in Rome, GA.
Maybe when you’re done it’ll be worth $3800 like that guy’s in Rome, GA.
I like turtles
-
KDXGarage
- KDXRider.net
- Posts: 14060
- Joined: 06:45 am Nov 01 2004
- Country: United States of America
- Location: AL, USA
- Contact:
Re: '86 - Down the Rabbit Hole
Congratulations on getting back on it.
Thank you for participating on kdxrider.net.
To post pictures from a device: viewtopic.php?f=88&t=24128
To post pictures from a device: viewtopic.php?f=88&t=24128