And your best idea was math?HopFrog175 wrote: 12:48 am May 13 2021
Heh, I had to do something while waiting for the epoxy to harden
HopFrog's 1980 KDX175 Build Log
-
Goofaroo
- Gold Member

- Posts: 531
- Joined: 12:42 pm Sep 09 2012
- Country:
- Location: Edmond, Oklahoma
Re: HopFrog's 1980 KDX175 Build Log
-
HopFrog175
- Platinum Member

- Posts: 80
- Joined: 11:50 pm Jan 26 2021
- Country: US
- Location: Los Angeles, CA
Re: HopFrog's 1980 KDX175 Build Log
Well, this seems to be the week of failures. I went to do another leakdown test after the JB Weld had hardened and discovered that my expandable plug had reached end of life.
Plug failure
_click image to zoom_
- kdx175_00_failed_leakdown.jpg (255.58 KiB) Viewed 44782 times
Ok, no problem, found some bits and pieces for a substitute.
1/4" pipe thread
- kdx175_01_failed_leakdown.jpg (183.03 KiB) Viewed 44782 times
- kdx175_02_failed_leakdown.jpg (232.76 KiB) Viewed 44782 times
Back in business, but no joy; the pressure drops from 5 psi at about 1 psi per 10 seconds
Looking for leaks
- kdx175_03_failed_leakdown.jpg (324.07 KiB) Viewed 44782 times
I sprayed soapy water everywhere (seals, plugs, head, spark-plug, cylinder base, intake, case screws, case seam, hose/gauge connections), pumped up and removed the pump - the only bubbles are from the crank seals. Looking closely, I can see the leaks are on the outer edge, where the seal is metal on metal - probably should have used some RTV I guess - which I will now do by taking everything apart and putting in new seals with RTV! (mental note: do leakdown tests straight away before putting other stuff on)
At least my new socket-headed screws will ease the process
- hf175w.jpg (5.94 KiB) Viewed 44782 times
-
Goofaroo
- Gold Member
- Posts: 531
- Joined: 12:42 pm Sep 09 2012
- Country:
- Location: Edmond, Oklahoma
Re: HopFrog's 1980 KDX175 Build Log
Sorry to hear that. At least you’re getting very proficient at working on this engine. lol
Keep up the good work!
Keep up the good work!
-
KDXGarage

- KDXRider.net

- Posts: 14676
- Joined: 06:45 am Nov 01 2004
- Country: United States of America
- Location: AL, USA
- Has thanked: 67 times
- Been thanked: 20 times
- Contact:
Re: HopFrog's 1980 KDX175 Build Log
Man. Sorry to hear it.
Thank you for participating on kdxrider.net. 
To post pictures from a device: viewtopic.php?f=88&t=24128
To post pictures from a device: viewtopic.php?f=88&t=24128
-
HopFrog175
- Platinum Member
- Posts: 80
- Joined: 11:50 pm Jan 26 2021
- Country: US
- Location: Los Angeles, CA
Re: HopFrog's 1980 KDX175 Build Log
Thanks for the support! I even tried to find a way out with math - didn't help :-)
-
HopFrog175
- Platinum Member
- Posts: 80
- Joined: 11:50 pm Jan 26 2021
- Country: US
- Location: Los Angeles, CA
Re: HopFrog's 1980 KDX175 Build Log
The replacement crank seals are ordered so, while waiting, I can switch gears and tidy up some other parts. I left the carb mostly finished but wanted to try lapping the needle/seat with valve-grinding compound.
Lapping needle/seat
_click image to zoom_
- kdx175_00_carb_fini.jpg (302.97 KiB) Viewed 44696 times
A piece of hose served as a twirly stick. I used a generous dab of compound and twirled for 5 minutes or so.
I used the fine grit only
- kdx175_01_carb_fini.jpg (188.65 KiB) Viewed 44696 times
After getting all of the grit out, it seemed to seal just fine (at least I could not blow through it while holding the needle onto the seat).
Next up was replacing the old flaking slide with a new shiny one that turned up on Ebay.
New carb slide!
- kdx175_02d_carb_fini.jpg (285.1 KiB) Viewed 44696 times
Finally, I wanted to try the Barkeeper's Friend cleaner just to clean things up. It came out great - thanks for the tip Goofaroo
Carb looks new
- kdx175_03_carb_fini.jpg (258.32 KiB) Viewed 44696 times
The carb is now pronounced as finished.
- hf175w.jpg (5.94 KiB) Viewed 44696 times
-
KDXGarage
- KDXRider.net
- Posts: 14676
- Joined: 06:45 am Nov 01 2004
- Country: United States of America
- Location: AL, USA
- Has thanked: 67 times
- Been thanked: 20 times
- Contact:
Re: HopFrog's 1980 KDX175 Build Log
Please do not post pictures of a new carb, then say that you worked hard or smart to make an old one look like new. :-)
Are you sure it is the seals that are leaking? If you are taking it apart, try some kawabond 5 or similar on the halves.
Are you sure it is the seals that are leaking? If you are taking it apart, try some kawabond 5 or similar on the halves.
Thank you for participating on kdxrider.net.
To post pictures from a device: viewtopic.php?f=88&t=24128
To post pictures from a device: viewtopic.php?f=88&t=24128
-
HopFrog175
- Platinum Member
- Posts: 80
- Joined: 11:50 pm Jan 26 2021
- Country: US
- Location: Los Angeles, CA
Re: HopFrog's 1980 KDX175 Build Log
I have not started on the new cranks seals yet but have been drilling for safety wire.
1/16" drill bit
_click image to zoom_
- kdx175_00_safety_wire.jpg (240.53 KiB) Viewed 44555 times
One other task is to figure out how much fork oil to use considering my new, and smaller, fork springs.
If I can get a baseline using the original springs maybe I can use it to set the oil level with the new springs. I think that I will try something like this:
- Follow the book on setting the oil level
- raise front wheel off ground
- remove spring
- measure oil level from top of tube (531mm)
- Insert the old spring and spacer back into the extended fork tube
- measure oil level from top of tube (should be less than 531mm)
- determine the volume of air above the oil
- Volume = FTv - Sv - SPv
- where:
- FTv = volume of the fork tube above the oil
- Sv = volume of the spring spacer
- SPv = volume taken by the coils of spring above the oil level
- remove the old fork spring and insert the new fork spring and spacer
- repeat the measurements and solve for FTv
- adjust the oil level to end up with the same volume of air above the oil
Oops, there's that math again - sorry
Actually, it might be easier to just take a guess and adjust the oil level as needed
- hf175w.jpg (5.94 KiB) Viewed 44555 times
-
KDXGarage
- KDXRider.net
- Posts: 14676
- Joined: 06:45 am Nov 01 2004
- Country: United States of America
- Location: AL, USA
- Has thanked: 67 times
- Been thanked: 20 times
- Contact:
Re: HopFrog's 1980 KDX175 Build Log
I think it may be more about air quantity, so use whatever oil quantity to get to the same oil level. The top of the oil level is the bottom of the air level / portion.
Thank you for participating on kdxrider.net.
To post pictures from a device: viewtopic.php?f=88&t=24128
To post pictures from a device: viewtopic.php?f=88&t=24128
-
HopFrog175
- Platinum Member
- Posts: 80
- Joined: 11:50 pm Jan 26 2021
- Country: US
- Location: Los Angeles, CA
Re: HopFrog's 1980 KDX175 Build Log
Zerk detour.
While drilling everything for safety wire, I was reminded that Zerk grease fittings on the rear suspension linkage seemed like a good idea:
Grease fitting locations
_click image to zoom_
- kdx175_00_zerks.jpg (432.24 KiB) Viewed 44134 times
I did a quick read up and am thinking that 1/4-28 Zerks (the smaller size) would work. The plan is to turn the ball sideways in the ball joint and then drill through the suspension link and outer bearing shell. The drill size for the 1/4-28 tap is 3 ga. (0.213") so I think I can just use it to drill all the way through and then tap the section of the hole in the link.
Drill here
- kdx175_01_zerk.jpg (78.93 KiB) Viewed 44134 times
I looked around but did not see where anyone else has done this. Without grooves, I guess that the grease would not be evenly distributed but at least some would get in and hopefully work itself around
- hf175w.jpg (5.94 KiB) Viewed 44134 times
-
KDXGarage
- KDXRider.net
- Posts: 14676
- Joined: 06:45 am Nov 01 2004
- Country: United States of America
- Location: AL, USA
- Has thanked: 67 times
- Been thanked: 20 times
- Contact:
Re: HopFrog's 1980 KDX175 Build Log
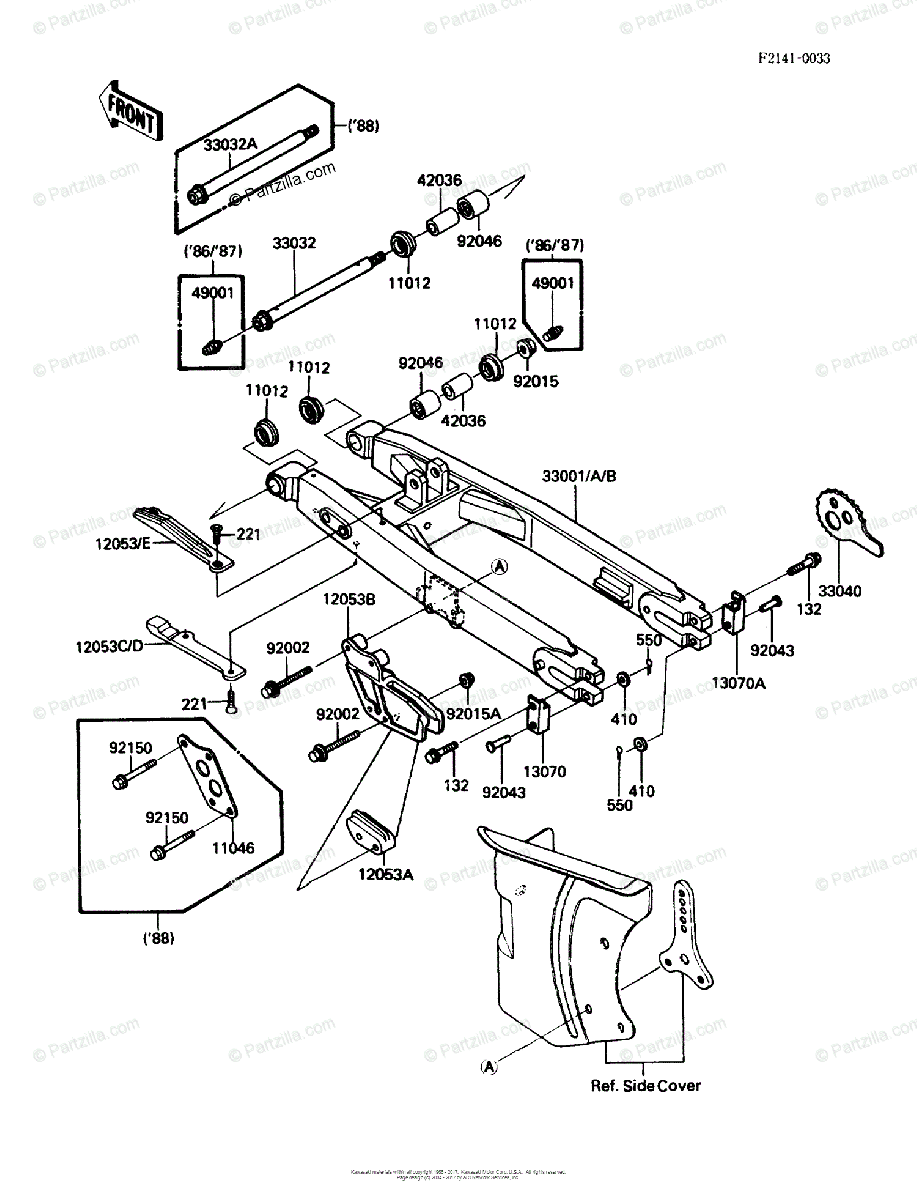
Look at what they did on the 1986 and 1987 KDX200.
Thank you for participating on kdxrider.net.
To post pictures from a device: viewtopic.php?f=88&t=24128
To post pictures from a device: viewtopic.php?f=88&t=24128
-
Goofaroo
- Gold Member
- Posts: 531
- Joined: 12:42 pm Sep 09 2012
- Country:
- Location: Edmond, Oklahoma
Re: HopFrog's 1980 KDX175 Build Log
For each zerk you will also want a weep hole.
And what about the swingarm?
I put zerks in the swingarm and shock linkage on my KLR650. Kawasaki should have done it at the factory.
I have one zerk on the linkage that is facing downward and is vulnerable to damage by rocks and such. I pulled it out and keep a short bolt in there as a plug. I only put the zerk in there when I grease it.
- 1C8ECE42-7F33-48FD-B83D-E173E8896E7B.jpeg (1.93 MiB) Viewed 44099 times
- DC0B010E-2EAD-45D8-A192-E145E3535247.jpeg (601.36 KiB) Viewed 44099 times
- 05CDA2EC-3489-4427-B8D4-9B65D00EC18F.jpeg (766.14 KiB) Viewed 44099 times
-
HopFrog175
- Platinum Member
- Posts: 80
- Joined: 11:50 pm Jan 26 2021
- Country: US
- Location: Los Angeles, CA
Re: HopFrog's 1980 KDX175 Build Log
Nice Zerks - thanks for the pics, I am inspired to continue! ( I am kicking myself for not putting them in when I first had everything apart
- hf175w.jpg (5.94 KiB) Viewed 44082 times
-
Goofaroo
- Gold Member
- Posts: 531
- Joined: 12:42 pm Sep 09 2012
- Country:
- Location: Edmond, Oklahoma
Re: HopFrog's 1980 KDX175 Build Log
Yep. I was installing a new Cogent Dynamics shock and decided to rebuild the linkage and drill everything for zerks while I had it apart. It’s definitely worth the effort.
-
HopFrog175
- Platinum Member
- Posts: 80
- Joined: 11:50 pm Jan 26 2021
- Country: US
- Location: Los Angeles, CA
Re: HopFrog's 1980 KDX175 Build Log
More on Zerks
The first step was rotating the ball in the suspension link 90 degrees. This proved to be nearly impossible. The new ball joint is really tight and the ball is really smooth. I got it rotated 45 degrees and then used a thin piece of plastic in the role of a drift. Hammering away through the thin gap on top of the ball, I got the ball rotated enough.
Rotated ball
_click image to zoom_
- kdx175_00_not_90.jpg (199.14 KiB) Viewed 44012 times
Drilling and tapping turned out to be easy. Too easy, almost. I expected the outer race to be hard and resistant to drilling - the drill went right through. After cleaning out all of the chips I illuminated and peered into the crack. Something was still in there (?) It looked like a bit of shredded woven nylon or something. Nowhere for it to come from except ... a hollow outer race?? It did drill really easily. This seems unlikely so I do not know what to think. Anyway, I used a tiny file to try and smooth out any burrs and rotated the ball back to normal. It did not seem to be any stiffer so I took this as a good sign.
Drilling and tapping
- kdx175_01_tapping.jpg (377.27 KiB) Viewed 44012 times
The Zerk fitting went right in and I hit the next snag - I could not pump in any grease.
The ball fits tight enough that, apparently, insufficient clearance exits for grease to come through. Which makes perfect sense in hindsight
Zerk but no grease
- kdx175_02_zerked.jpg (220.78 KiB) Viewed 44012 times
Well, that was a waste, hopefully the ball joint is no worse for having a hole in the outer race. I think I will skip the two other joints in the link
- hf175w.jpg (5.94 KiB) Viewed 44012 times
-
KDXGarage
- KDXRider.net
- Posts: 14676
- Joined: 06:45 am Nov 01 2004
- Country: United States of America
- Location: AL, USA
- Has thanked: 67 times
- Been thanked: 20 times
- Contact:
Re: HopFrog's 1980 KDX175 Build Log
The balls for 1986 - 1987 have slots with a hole, plus a bolt with a hole to allow the grease in.
Thank you for participating on kdxrider.net.
To post pictures from a device: viewtopic.php?f=88&t=24128
To post pictures from a device: viewtopic.php?f=88&t=24128
-
Goofaroo
- Gold Member
- Posts: 531
- Joined: 12:42 pm Sep 09 2012
- Country:
- Location: Edmond, Oklahoma
Re: HopFrog's 1980 KDX175 Build Log
Sorry to hear that it didn’t work out.
I did a quick search on line for the ball joint boots that are part number 49006-1045 and came across some on EBay. Haven’t searched for the other ones but you might get lucky. I’m assuming your boots are pretty worn out by now.
I did a quick search on line for the ball joint boots that are part number 49006-1045 and came across some on EBay. Haven’t searched for the other ones but you might get lucky. I’m assuming your boots are pretty worn out by now.
-
HopFrog175
- Platinum Member
- Posts: 80
- Joined: 11:50 pm Jan 26 2021
- Country: US
- Location: Los Angeles, CA
Re: HopFrog's 1980 KDX175 Build Log
Even more on Zerks
In the previous step, I gave up on adding Zerks to the ball joints in the rear suspension rocker arm because there is no clearance within the bearing into which to pump the grease - the ball fits tightly and seals the inlet hole
This leaves the swing arm so I started in by removing a recently installed needle bearing.
Pressing out the swing arm bearing
_click image to zoom_
- kdx175_00_disassembly.jpg (330.11 KiB) Viewed 43922 times
Next I fit the engine and swing arm to the frame to check Zerk clearance.
Test fit
- kdx175_01_test_fit.jpg (377.46 KiB) Viewed 43922 times
Then, back on the bench, I finally notice - there is really no place to put the Zerks here either! There is no path for the grease to get into the needle bearing.
A Zerk placed in the middle will be blocked by the bearing shell. If it is placed at the end, the oil seal will block the grease.
No place for grease to come in
- kdx175_02_needle_bearings.jpg (323.4 KiB) Viewed 43922 times
And, the metal end of the oil seal is curved and looks too narrow for a Zerk.
Cannot really put a Zerk here
- kdx175_03_seal.jpg (181.48 KiB) Viewed 43922 times
I am concluding that the KDX175 is not really amenable to Zerks. The time/effort involved just does not seem worth it.
- hf175w.jpg (5.94 KiB) Viewed 43922 times
-
KDXGarage
- KDXRider.net
- Posts: 14676
- Joined: 06:45 am Nov 01 2004
- Country: United States of America
- Location: AL, USA
- Has thanked: 67 times
- Been thanked: 20 times
- Contact:
Re: HopFrog's 1980 KDX175 Build Log
86 - 88 grease fittings are on the ends of the swingarm bolt with special sleeves to allow passage of grease
Thank you for participating on kdxrider.net.
To post pictures from a device: viewtopic.php?f=88&t=24128
To post pictures from a device: viewtopic.php?f=88&t=24128
-
HopFrog175
- Platinum Member
- Posts: 80
- Joined: 11:50 pm Jan 26 2021
- Country: US
- Location: Los Angeles, CA
Re: HopFrog's 1980 KDX175 Build Log
86 - 88 grease fittings are on the ends of the swingarm bolt with special sleeves to allow passage of grease
Ah, the missing link of KDX grease joints, thanks memberlist.php?mode=viewprofile&u=6252KDXGarage
I am still stuck tho
In my case, I just do not see an easy path for the grease. The inner sleeves, spacer, shims and seals are in a stack which is compressed by the swingarm pivot bolt. For grease to get to the bearing from holes in the bolt, I would need to drill a hole in each sleeve and align each with the matching hole in the bolt. It seems like I would also need some way to index the holes and keep them lined up.
Zerk grease fittings may be in the future but, for now, I am just going to stay with periodic disassembly, cleaning and repacking.
- hf175w.jpg (5.94 KiB) Viewed 43898 times