
Fig 1
Directions Use clean Kayaba inverted forks to perform the following. Some steps can be omitted if Gold Valves are not being installed. Remove the forks from the bike before starting the work sheet. Gold Valves are a registered name from Race Tech. If Gold Valves are not installed on your forks, substitute the words Gold Valve with Base Valve since that is what they are called on stock forks. This worksheet can be used for all KYB inverted forks with stock base valves or Race Tech's Gold Valves.
1. Remove the fork cap from the top of the fork. If the fork cap will not come of, install the outer tube in a padded vise and loosen the cap. Do not over tighten the vise. Remove the fork from the vise and remove the fork cap making sure the fork is held upright.
2. Push down the fork spring and insert a wrench on the push rod nut, fig 1. While holding the pushrod nut, remove the fork cap.
Fig 1
3. Remove the fork spring seat and spring.
4. Remove the short rebound adjuster rod, fig 2, from the push rod.
5. Pour the fork oil out of the fork.
6. Turn the fork upside down and pump the push rod until the long rebound adjuster rod falls out and all of the oil is drained.

Fig 2
7. Remove the pushrod nut, collar, spring guide, and o-ring, fig 3.

Fig 3
8. Mount the fork in a padded vise and remove the rubber cap from the compression assembly on the bottom of the fork. Insert the fork cylinder holder (Kawasaki part number 57001-1287) through the top of the fork. Using an allen head socket wrench, loosen the compression assembly from the bottom of the fork while holding the fork cylinder tool, fig 4.
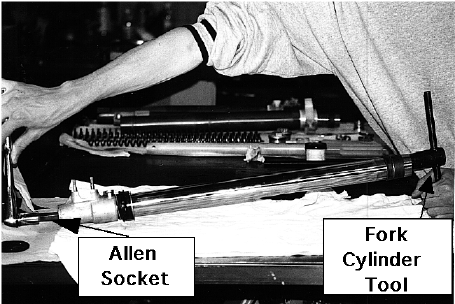
Fig 4
9. Remove the compression assembly from the bottom of the fork, fig 5.

Fig 5
10. Pull the push rod and cylinder out of the outer fork.
11. Using two open end wrenches, unscrew the guide stay nut out of the piston holder, fig 6.
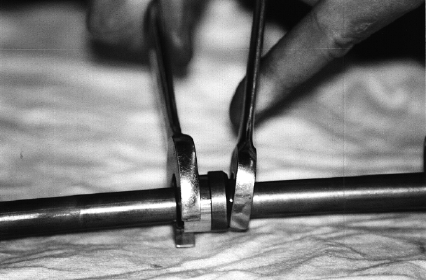
Fig 6
12. Remove the guide stay nut, oil lock piston, split ring keepers, and piston holder. fig 7.

Fig 7
13. Pull the pushrod out of the bottom of the cylinder, fig 8.

Fig 8
14. Remove the fork dust seal.
15. Remove the retaining clip from the outer tube, fig 9.

Fig 9
16. Grab the inner and outer tubes and forcefully stroke them up and down until the tubes come apart.
17. Carefully spread the guide bushing apart just enough to remove it and slide the guide bushings, washer, fork oil seal, retaining ring, and dust seal from the inner tube, fig 10.
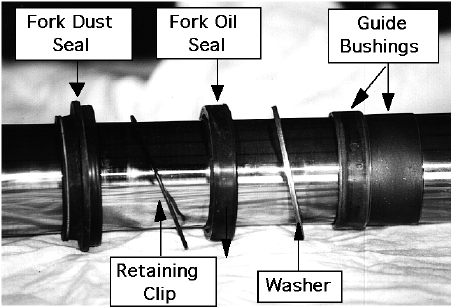
Fig 10
18. Clean all of the parts in cleaning solvent and let dry. If the forks only need an oil change you can continue on to step 30. Inspect all of the parts.
19. Before removing the nut on the compression valve, the threads above the nut must be filed off. Use a file and file lightly the end of the threads until they are flush with the top of the nut.
20. Remove the nut, spring cup, check valve sleeve, check valve plate, base valve, low speed valve stack, high speed valve stack, and base plate, fig 11. Lay out the pieces in the order they came of the shaft. Clean and inspect the pieces.
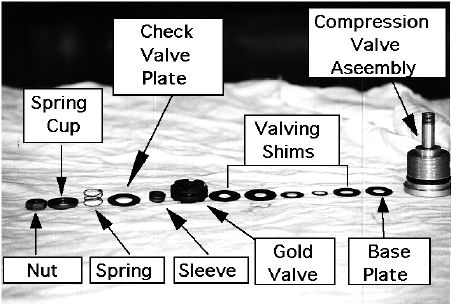
Fig 11
21. Using the chart supplied with the Gold Valve, select the low and high speed valving.
22. Place the original base plate(s) (this is the very thick washer) on the shaft of the compression valve body.
23. Install the high speed valving starting with the smallest diameter and ending with the largest diameter shim.
24. Install the low speed valving (on the high speed valving) starting with the smallest diameter and ending with the largest diameter shim.
25. Install the o-ring on the outside of the Gold Valve and install the Gold Valve on the shaft with the recess on the piston facing up, fig 12.

Fig 12
26. Install the check valve sleeve, fig 13, on the shaft making sure it fits into the recess in the Gold Valve. Install the check valve plate and spring.

Fig 13
27. Install the spring cup on the shaft with the dished part facing down. Look at the threads on the shaft and make sure the check valve plate is higher than the end of the threads, fig 14. This is very critical. If the nut runs out of threads before tightening down the check valve plate and base valve, the nut may loosen and cause damage. Shims can be added beneath the base plate to make sure the nut will tighten down. Make sure the nut will tighten down and not run out of threads.

Fig 14
28. Use blue Locktight 242 on the shaft threads and carefully install the nut. Torque it to 48 inch/lbs. Do not torque it to more than 48 inch/lbs.
Note: Most 1995 thru 1997 use a "mid valve" located on the rebound piston (located on the pushrod assembly, fig 8). This works for supercross and some very aggressive pro riders but is too harsh for outdoor use. Race Tech recommends converting the "mid valve" back to the standard check plate design (just like the compression assembly). Remove the existing "mid valve" parts and reinstall the cupped washer, sleeve, check spring, check valve plate, rebound piston (recess towards check plate), rebound valving, base plate, and nut.
30. Place a plastic bag over the end of the inner fork tube, fig 15. This will protect the seals from damage while sliding them onto the tube.

Fig 15
31. Install the fork dust seal, retaining clip, and fork oil seal over the plastic and inner fork seal. Remove the plastic from the fork tube and install the washer, and guide bushings (refer to fig 10 for parts orientation).
32. Place the inner fork tube inside the outer fork tube. Slide the bushing, washer, and fork seal into the outer tube. Use a split fork seal driver and tap the fork seal in until the retaining ring groove is seen. Install the retaining ring and dust seal.
33. Place the pushrod into the bottom of the cylinder, (see fig 8). Install the piston holder with the threads facing up. Install the oil lock piston with the notches facing down. Install the two split rings and guide stay nut into the piston holder. Torque the guide stay nut to 20 ft/lbs (2.8 kg-m).
34. Install the push rod and cylinder into the fork with the large female threads facing the bottom of the fork.
35. Install a new compression valve gasket and o-ring and install the compression assembly into the inner tube using Locktight 242 (blue) on the threads. Torque the compression assembly to 40 ft/lbs (5.5 kg m). Use the holding tool and allen socket while tightening.
36. Install the o-ring, spring guide, collar (large end facing down), see fig 3.
37. Install the push rod nut with the chamfered side facing down, fig 16. Tighten the push rod nut at least 18.5 mm or more from the top of the pushrod, fig 17.
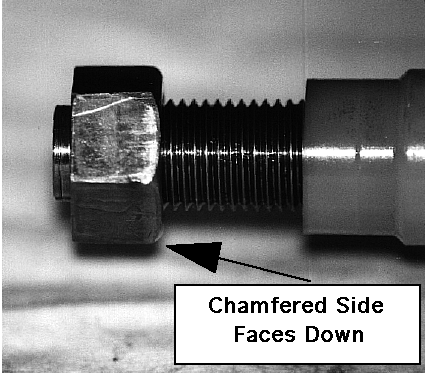
Fig 16

Fig 17
38. Install the long rebound adjuster rod into the pushrod. Install the short rebound adjuster rod into the pushrod, (refer to fig 2.
39. Pour In the specified fork oil until it is nearly full. Pump the forks a few times. Bleed the air from the fork by stroking the push rod until no more air is seen. Kawasaki sells a special tool (part number 57001 1289) that makes this job much easier. It may necessary to add more oil to the forks as the air is eliminated.
40. The fork oil must be set using a fork oil gauge, fig 18, while the forks are compressed. Some KYB forks have bleed holes drilled in the inner tube (the chrome tube). There is a space between the inner and outer tubes that can cause false oil level measurements. To deal with this problem, extend the fork all the way out and then compress the forks. This will require a slightly higher oil settings than the manufactures recommendations. Adjust the fork oil height to the manufactures specifications.

Fig 18
41. Install the fork spring and spring seat and screw the fork cap up against the pushrod nut. Torque the pushrod nut (14.5 ft lbs or 2.0 kg-m) to the fork cap.
42. Slide the upper fork tube up and tighten the fork cap into the upper fork. Torque the fork cap to 22 ft/lbs (3.0 kg-m).
43. Adjust the compression adjuster (bottom of the fork), fig 19, to 10 clicks out and the rebound adjuster to 12 clicks out (located on the top of the fork).

Fig 19
For private non profit use only. All rights reserved.
Please Contact me for use of this material.
URL:http://www.motocross.com/motoprof